Showing posts with label Eyelet Outlet. Show all posts

Friday, February 24, 2023

Cowgirl Love!

  Happy Friday, friends!  Today, I am sharing a card that I had SO much fun creating!  I recently hosted a Mystery Craft Along with some of my favorite friends, and I taught them a variation on the Twisted Ribbon Technique.  I had so much fun with it, that I wanted to try it with washi tape rather than paper, and this time I used the traditional technique.

I love the Glitter Washi Tapes so much, so I decided to pair the Black and Hot Pink to create the Twisted Ribbon Panel.  I die-cut a black and pink banner and paired it with this adorable cowgirl image (colored with Copic markers) from The Greeting Farm that I received at Jennifer Dove's Boot Camp. 

I die-cut the sentiment from a die in my stash and adhered it to the card front.  To complete my card, I added a silver metallic bow to the hot pink paper flower, and then added one of the beautiful new Rose Brads.

I hope you love this card too!
Shopping List: 

Thank you so much for hanging out with me! 

Xoxo, Kim

Friday, February 17, 2023

Life Can Be Prickley!

  Hi friends!  Have you ever needed an encouragement card and just didn't know what to do?  That was me, until I saw the "coming soon" Cactus Brads from Eyelet Outlet!  I knew that they would be a perfect match for the Prickly Pear Catcus Clear Stamp Set from Prickley Pear Stamps!

I colored the Prickly Pear Cactus Image with Copic markers, die-cut it and set it aside. I used the amazing Glitter Washi Tape - Copper to cover the edges of a cardstock panel.  You'd never know it, but I just grabbed the first piece of card stock I could find.  It's yellow (haha), but since the washi covers it, it doesn't show.
I layered a piece of digital paper with the washi panel and adhered them to my card base.  I added my focal image to the front of the card.  I embossed the sentiment on a strip of cardstock and added a couple of Cactus Brads before adhering it to the front of the card.  To complete the card, I created a bow and using my glue gun, I glued one of the brads to the center and then to the front of the card. 

I love how this came together!  The brads and the stamp set paired beautifully!

Make sure to check out the shops at the links above to see these beauties!

Thank you so much for hanging out with me! 

Xoxo, Kim

**Affiliate links provided at no additional cost to you.  Thank you so much for supporting my habit!**

Friday, February 10, 2023

HBD!

 Happy Friday, crafty friends!  I am still working on building my stash of birthday cards, and it is so fun and easy to do using brads, as there are endless possibilities!  

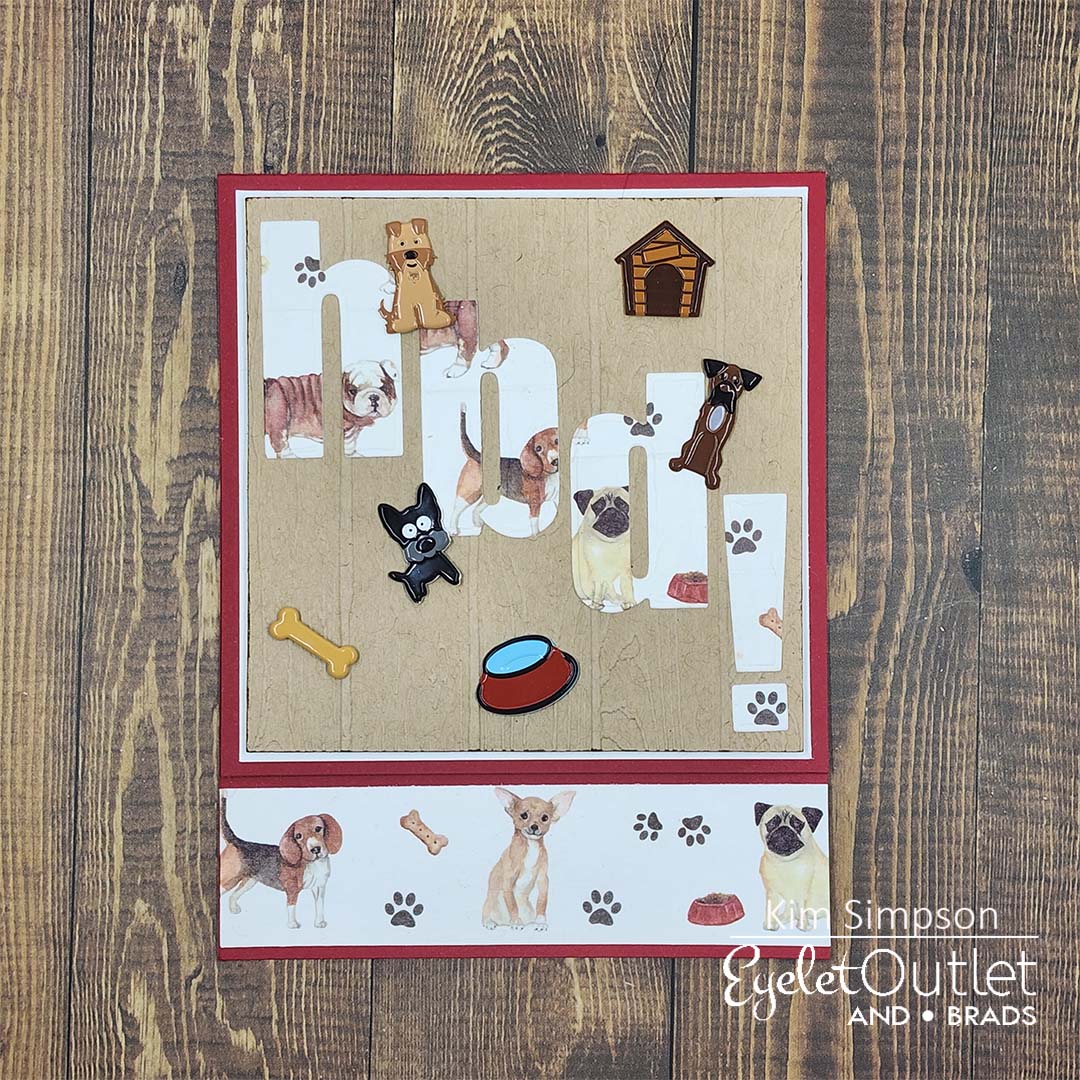
I have so many dog lovers in my life, so I made a card for one of them.  I started by wrapping a strip of white card stock with Dog Washi Tape.  I trimmed the front of my card base down and adhered the washi panel to the inside of the card base.  This allows the dogs to show on the front of the card when it is closed, and on the inside panel.

I wrapped another panel of white card stock with the washi tape and I die-cut the letters "h, b, d, and !" from that panel.  I adhered the HBD diagonally to a wood-grain kraft panel.   I embellished the panel with several of the Puppy Brads and Kennel Mix Brads before adhering to the card front.

I hope you are inspired to create something today!  This card was really a lot of fun to make! 

Shopping List: 

Thank you so much for hanging out with me! 

Xoxo, Kim

Friday, February 3, 2023

For My Favorite Handyman!

 Happy Friday, friends!  Are masculine cards a struggle for you?  They sure are for me, and I never seem to have enough birthday cards for the guys in my life!  I created a super fun birthday card for my favorite handyman.  

I started by creating a background panel by alternating the Tool Washi Tape with strips of card stock that I die-cut.  I created my focal point by adding a large die-cut birthday sentiment to a piece of craft cardstock.  

Before adhering the panels to the card base, I added screw dies to each corner of the washi panel, and I used some toolbox and tool dies on the sentiment panel.  I then popped them up on the card base with foam dots.
Shopping List: 

Thank you so much for hanging out with me! 

Xoxo, Kim

Friday, January 27, 2023

A Unicorn Birthday Wish!

  Hello, crafty friends!  I never seem to have enough birthday cards in my stash, so I thought today would be a great day to build up some of my stash!  

I am really trying to work on some clean and simple cards, because they really allow the embellishments to shine. 

I started by wrapping the edges of a card stock panel with Glitter Blue Green Washi Tape and adhered it to a pink card base.  I dry embossed the main card panel with a balloon embossing folder from my stash.  I die-cut the sentiment in teal card stock and adhered it to the embossed panel before setting some of the darling Unicorn Brads in place. I adhered the panel to the card front and added the Rainbow Brad to my bow with my hot glue gun. 

This was such a fun card to create!  I hope you are inspired to pull out your favorite embellishments and get to work!

Shopping List: 

Thank you so much for hanging out with me! 

Xoxo, Kim

Friday, January 20, 2023

Sunflower Wishes

 Hello, crafty friends!  Are you a fan of sunflowers?  I sure am!  I love how cheerful they are, and one of the most amazing sights is to see a field full of them, so tall and proud as they reach for the sun!  

When I saw the Sunflower Washi and Sunflower Brads, I knew I wanted to create a country styled card with them.  I started by covering the lower portion of a white panel with the washi tape and then embossing the upper portion with my favorite wood-grain embossing folder.  I left the portion of the panel covered by washi hanging out of the folder so that it didn't emboss. 

I die-cut the beautiful sunflower and leaves from card stock and vellum, and I inked them up using distress inks to add a bit of dimension to the images.  I wrapped the washi panel with blue and white gingham ribbon and adhered the die-cut pieces to the panel which allowed me to determine where I wanted to place the brads.  I added a panel of matching blue card stock to my card base, and then popped the white panel up with foam tape, to allow room for the backs of the brads.  Lastly, I added a bow to the card front.  I did not add a sentiment yet, as I don't know what occasion I will use this card for - there are so many options! 

I hope you love this card as much as I do! 

Shopping List: 

Thank you so much for hanging out with me! 

Xoxo, Kim

Friday, January 13, 2023

Thanks SO Much!

  Hi friends!  What is the weather like where you are at?  It is cold here, and mostly rainy!  Hopefully, we are done with the snow for a while.  

I needed a thank you card for a friend, so I went with a wintery theme. 

To create my card, I adhered the Glitter Tree Washi Tape to a piece of white card stock and die-cut it into a banner.  I dry-embossed it with a snowflake embossing folder, leaving the portion covered with washi tape hanging out of the folder.  I also used the same embossing folder on a white card panel.  I die-cut the large sentiment from shimmery blue paper and I layered up all the elements of my card.
I added the Snowflake Brads and also used one to embellish the bow.
I love, love, love how this card turned out! 
Shopping List: 

Thank you so much for hanging out with me! 

Xoxo, Kim
Friday, January 6, 2023

Happy Birthday to Moo!

 Hi crafty friends!  I hope that you have recovered from the holidays and life is settling down for you.  

I had the best time creating this barnyard birthday card for Eyelet Outlet!   I started by creating the adorable barn using the Lawn Fawn Build-A-Barn Dies.  I added a chicken to the window, and a goat and cow to either side of the doors.  

I wanted to add a little bit of sparkle, so I used the Glitter Black Washi tape to add a border to my sentiment strips.  Lastly, I added a bow from baker's twine.
Shopping List: 

Thank you so much for hanging out with me! 

Xoxo, Kim


Friday, December 30, 2022

My Eyelet Outlet Top 3 Faves from 2022

  Hi crafty friends!  I am over on the Eyelet Outlet Blog today, sharing my Top 3 Favorite Projects from this year and wanted to share them with you, also!  I cannot believe that we are about to say farewell to 2022!  

My first fave is this fun, super crazy Super Hero card that I created several months back, perfect for someone that needs a little encouragement. 

I colored up this cutie with Copic markers and embellished the card with the Super Hero Saying Brads and my favorite Glitter Red Enamel Dots. 

Shopping List: 

Super Hero Saying Brads

Glitter Enamel Dots - Red

Next on my list is America's Favorite Redhead with a grape-ful message for a friend! 

Again, colored with Copic Markers and I paired this card with the Grape Brads, Wine Washi Tape and White Pearl Bling Strips.   This card brings back so many happy memories!

Shopping List: 

Grape Brads

Wine Washi Tape

Pearl Bling Strips - White

And last, but not least is this fun coffee cup gift card holder.

I paired a die in my stash with some pretty autumn-themed pattern paper and embellished with the Mini Leaf Brads and the Brown Jewel Strips.

Shopping List:

This was such a fun opportunity to go back through past projects.  I hope you enjoyed it too!

Happy New Year and see you with more fun projects in 2023!

Thank you so much for hanging out with me! 

Xoxo, Kim

Friday, December 16, 2022

Lessons Learned from Penguins

Hello friends!  Do you love penguins as much as I do?  I could sit and watch them waddle and play all day long!  Additionally, they provide great lessons in leadership and teamwork.  And don't forget they teach us how to walk safely in winter weather!  Just ask my team.  We do the penguin walk at every holiday meeting!  It is a riot!

For my Eyelet Outlet project today, I used a simple card sketch that is full of layers.  I used the Glitter Black Washi Tape to create a panel.  I then used the Penguin Washi Tape to create my next panel.  It is so easy to add washing tape over a strip of card stock and you have a perfect embellishment for your card.
To complete my card, I made a loopy bow from my absolute favorite ribbon.  This ribbon is SO old.  I bet I have had it for 20 years, but it is perfect for Christmas projects!  I added a Pine Tree Brad to the bow and adhered it to my card front.
Shopping List:

Glitter Black Washi Tape

Penguin Washi Tape

Thank you so much for hanging out with me! 

Xoxo, Kim 


Friday, December 9, 2022

Santa Claus Is Comin' To Town!

Happy FriYAY, friends!  I can't believe how quickly the time is flying!  I am so not ready for the holidays.

Today, I am sharing another fun simple holiday card over on the Eyelet Outlet Blog that I created using several of the amazing products available in the shop.  I used one of the card bases that I created for Kendra's Card Challenge which made it so easy to put this together!  I started with a black card base and a fun piece of patterned paper, followed with green cardstock accents.  I die-cut a cardstock circle and carefully layered Brick Washi Tape over it to create a chimney.

Even though I had taped my die down to the green cardstock, it moved and cut part of the circle edge off, so I trimmed it into a straight line and trimmed the washi circle down to match.  I added Santa (brad) to the "chimney" and popped that circle up on foam dots.  To complete my card, I added Black and Red Glitter Enamel Dots.  I didn't add a sentiment, as I felt the patterned paper did enough.

I am so happy to have knocked another Christmas card out!  I am so thankful for the Eyelet Outlet products that make it so easy to create fun and festive cards without too much fuss! 

Shopping List: 

Santa & Mrs. Claus Brads

Brick Washi Tape

Glitter Enamel Dots - Red

Glitter Enamel Dots - Black

Thank you so much for hanging out with me! 

Xoxo, Kim


Friday, December 2, 2022

A Sock Monkey Christmas

 Hi friends!  How are you coming along on your holiday cards?  I am making slow, but steady progress, and today I am so excited to share one of them that I created for Eyelet Outlet!  I have been working through Kendra's Card Challenge and used one of the sketches for this card.

I created this simple card using my absolute favorite brad - the Holiday Sock Monkey!  This little fella is the absolute cutest! 
I paired him with some fun holiday patterned papers, and I tied a loopy bow from metallic embroidery floss and created a button from a Candy Cane Brad to adhere the bow to. (I removed the prongs from the brad using wire snips and used a hot glue gun to add the bow to the back of the brad.)  Lastly, I added my favorite embellishments - Red Glitter Enamel dots.
I love that this card is pretty clean and simple, but not boring!  
Shopping List: 

Holiday Sock Monkey Brads

Candy Cane Brads

Glitter Enamel Dots - Red

Thank you so much for hanging out with me!  

Xoxo, Kim

Kim - Blog - Facebook - Instagram

Friday, November 25, 2022

Walking In a Winter Wonderland!

 Hello, friends!  Today, I am over on the Eyelet Outlet Blog, and I wanted to make sure that I shared this card here, too!!  A week has passed since my last Eyelet Outlet post, and I have made a little more progress on my Christmas cards.  How about you? 

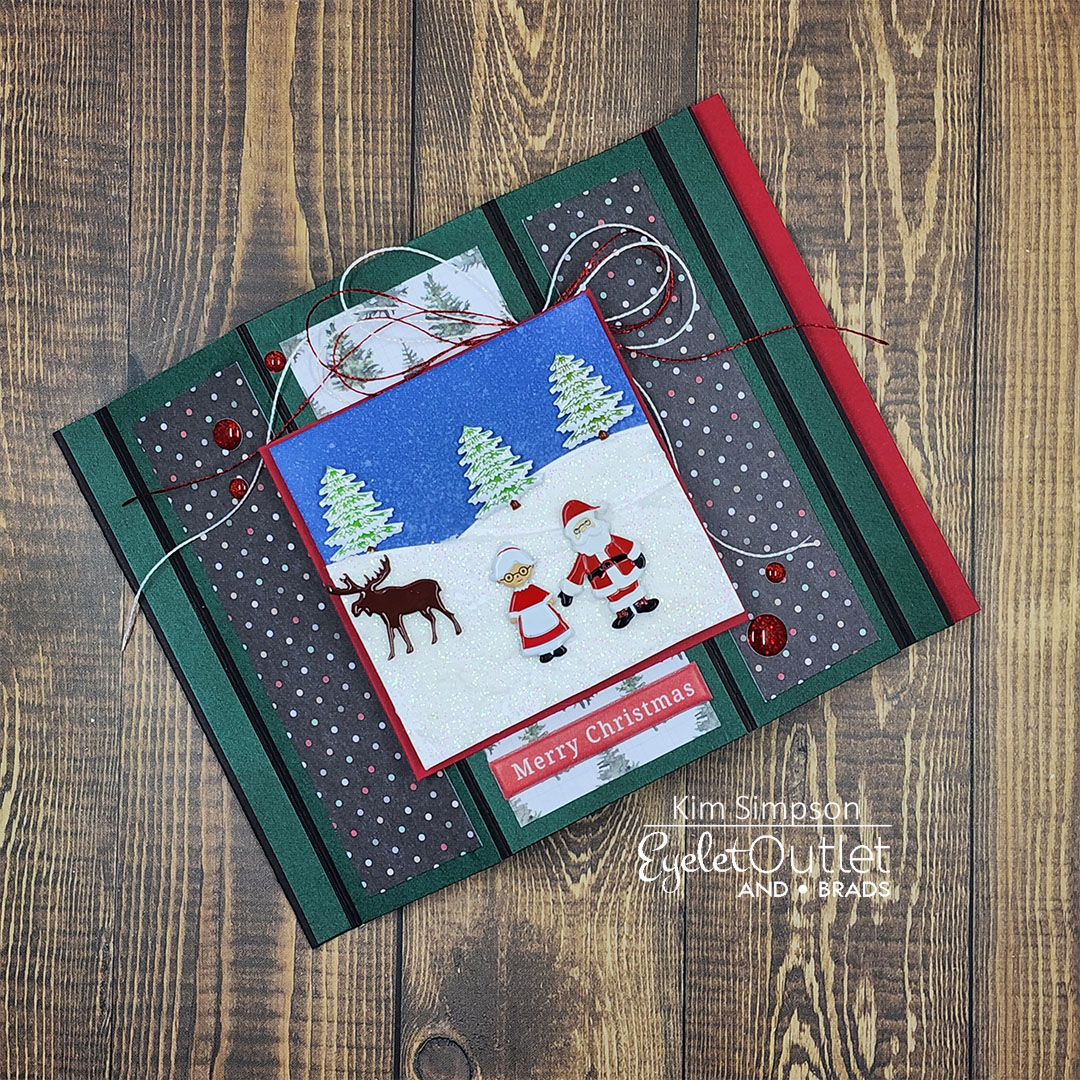
A few weeks ago, my crafty friends @lvhandcrafted, @stamprgrl, and I had the pleasure of doing a Live Mystery Craft Along (MCA) and Linh taught us a new fun-fold technique.   If you missed the live event, you could still catch the replay (Make sure to hit that subscribe button while you are there!)!  I had so much fun creating this Bay Window card (I had never used this fold before) starring a little winter wonderland scene that I made using some of the amazing winter/holiday brads that are in the shop (see my shopping list below for the links).
I started with a square of Bristol Smooth card stock and I ink-blended the entire square using Distress Oxide Ink in Chipped Sapphire.  I did several rounds of spritzing it with water to add the snow fall to the sky.  I die-cut some hills using a die that I have in my stash, adhered them to the square and trimmed the edges off.  I added some sparkly texture paste to the hills.  My tub is nearly dried out, and it has been retired, so I need to find another sparkly paste that I like.
I then added the brads to the panel to create my scene.  To complete my card, I added my favorite - the Glitter Enamel Dots in red!  I couldn't believe how cute this turned out. 
I love this card fold, as it folds flat for mailing, but it stands on its own, and the possibilities are endless!
Shopping List: 

Tree Brads - Snow

Santa & Mrs. Claus Brads

Moose Brads

Glitter Enamel Dots - Red

Thank you so much for hanging out with me! 

Xoxo, Kim

Friday, November 18, 2022

Have YoursELF a Merry Christmas!

Happy, happy Friday, friends!  I don't know about you, but I feel like the holidays are coming way too quickly.  I am not ready... not even a little bit!  So, I decided to make this fun card for a special co-worker!   

My crafty friend, @StamprGrl did a video a while back showing how to make the Center-Step fold.  I always thought it would be so much more difficult than it is!  I am so excited to finally know how to make this fold.  It was perfect to make this adorable elf card for a special co-worker. 

I colored up the elves from the new Artful Angel Santa's Crew stamp set, cut them out and set them aside to create the card. 
I decorated the card using some retired patterned paper from Stampin' Up.  I have been hoarding this pack of paper because I just love it... but I am trying to be better about using it.   I wanted some sparkle on the main panel, so I used the Snowflake Bling from Eyelet Outlet and paired it with Snowflake Brads on the side panel.  What elf card could be complete without Elf Brads?  I thought that they were perfect on either side of my sentiment.
If you aren't familiar with this fun-fold, it is free-standing, and I just love it!  It was so easy to decorate the inside of the card too!  
Shopping List:

Santa's Crew

Snowflake Brads

Snowflake Bling - 1/2 Inch

Elf Brads

Do you make your own holiday cards?  I would love to hear from you!  

Thanks so much for stopping by!  

Xoxo, Kim

Friday, November 11, 2022

A Traditional Season's Greeting

Hi friends!  Question for you - Are you a fan of traditional holiday cards, or do you prefer non-traditional themes?  I absolutely love traditional holiday cards and decorations!  I am  over on the Eyelet Outlet blog today sharing this beautiful traditional Christmas card. 

When I saw the Cardinal (and Female Cardinal) Brads, I knew that I wanted to pair them with some beautiful greenery and cones.  I thought that they would be the perfect embellishment to dress up my card.

I roughed up the edges of my printed paper with a distressing tool, layered it on red cardstock and adhered it to my card base.  I arranged the winter foliage around my circles and then tucked the sentiment tag under the foliage.  I added the Cardinal Brads and then finished up with a metallic red bow and Red Glitter Enamel Dots

I really love the traditional look of this card!  I hope you do too.

Thanks so much for spending a few minutes with me!  

Xoxo, Kim

Friday, November 4, 2022

Hey Pumpkin!

Hi friends!  I am over on the Eyelet Outlet blog today!  I had so much fun creating my last Memory Dex Card that I decided I needed to create a fall-themed one to share with you!   I also am participating in a Dex swap, so this was a great opportunity to kill two birds with one stone!  

I colored up these cute images from the Happy Fall Y'all stamp set from Scrappy Boy Stamps with Copic Markers (listed below), cut them out and set them aside.   I knew that I wanted to pair her with some fall brads, so when I die-cut my Memory Dex card, I knew that I would need multiple layers so that I could add some foam to leave room for the brads in back.  I die-cut one card from heavy-weight card stock, and I cut two more from two different patterned papers.
I used my paper trimmer to cut the plaid card to 2" and I adhered it to the leaf patterned card.  I wrapped them with Sparkle Copper Glitter Washi Tape (this is literally my favorite washi ever!) and then I adhered my colored images to the card front.  
I added a Pumpkin Brad at the base of her feet and scattered some Mini Leaf Brads all around.  Once they were in place, I added foam tape to the back and adhered it to the heavyweight dex card.   Lastly, I stamped my sentiment, and I bordered it with a layer of cardstock that I wrapped with the washi.
Colors Used:
Skin - E04, E11, E21, E00, E000, R20
Hair/Squirrel - E29, E27, E25
Squirrel Face - E04, E11, E21
Sweater/Hat Band - BG49, BG57, BG53, BG11
Hat/Boots/Pumpkin - E09, E08, E15
Pumpkin - YR18, YR27, YR24
Pants/Pumpkin - YR24, YR26, YR23, YR21
Shopping List
My swap partner already received my Dex Card.  I hope that she loved it as much as I do.  I honestly hated to send it in the mail!  LOL  I hope you are inspired to try your hand at creating your own Dex card!  
Thanks so much for stopping by! 
Xoxo, Kim

Friday, October 28, 2022

Spooktacular Greetings!

Happy Friday, friends!   Today, I am over on the Eyelet Outlet Blog sharing this fun card that I created.  If you caught our Crafty Fun w/Friends episode last weekend, you saw us create different versions of the Split Window Fold.  This was actually my prototype that I created to make sure that I didn't completely bomb it while we were live. 

I wanted to squeak in one more Halloween card before I ran out of time so I colored up this cute witch image from the Kindred Stamps Journey Home stamp set (colors below), cut her out and set her aside.   Even though the stamp set is really geared towards fans of those pesky, flying monkeys, I thought this image was perfect for Halloween! 

I started with a black card base and paired it with some fun patterned papers.  I determined where I wanted the aperture to be, and I taped the papers down to the card base, laid the die down and ran it through my die-cutting machine.  Before adhering the patterned papers to the card front, I laid down some Glitter Black Washi Tape to the edges to add a point of interest.  I love adding washi tape, because it is a super easy way to add trim and dimension.  

I added a panel of white cardstock to the inside panel of the card, and I die-cut some additional circles to fill in the aperture, followed by the witch.  Because the left side of the top panel is glued shut (think Book-Fold Card), it is OK for the image to overlap the left side.
I heat embossed my sentiment in black and I layered the panel on some orange glitter cardstock.  I added the Mini Candy Corn Brads and a Witch Hat Brad to add some additional dimension.   Lastly, I added a loopy bow made of sparkly, black bakers twine.
Colors Used:
Skin - G99, YG67, YG63, YG00, R20
Hair/Hat Band/Cape - V09, V06, V05
Hat/Dress - C9, C7, C5, C3, C1
Broom - E18, E15, E13, E29, E27, E25I had so much fun creating this card and I was amazed at how easy it really was!  
Thanks so much for stopping by! 

Xoxo, Kim