Showing posts with label Winter Cards. Show all posts

Sunday, January 15, 2023

Let's Celebrate!

Hi friends!  Today, I am sharing a fun winter themed wobbler card that I created using the darling Agnes Elephant from Polkadoodles. 

I wanted to use bright cheerful colors to convey a celebration theme.  I figured it is perfect for birthday, congratulations, really anything that calls for celebrating! 

I colored Agnes with Copic Markers, cut her out and paired her with some fun digital papers.  I added some sparkles behind her skates to give the illusion of being on ice and attached her with a wobbler element, so when you touch her, she wiggles. 
I hope that you love Agnes as much as I do!  
Thanks so much for stopping by! 
Xoxo, Kim


Friday, January 13, 2023

Thanks SO Much!

  Hi friends!  What is the weather like where you are at?  It is cold here, and mostly rainy!  Hopefully, we are done with the snow for a while.  

I needed a thank you card for a friend, so I went with a wintery theme. 

To create my card, I adhered the Glitter Tree Washi Tape to a piece of white card stock and die-cut it into a banner.  I dry-embossed it with a snowflake embossing folder, leaving the portion covered with washi tape hanging out of the folder.  I also used the same embossing folder on a white card panel.  I die-cut the large sentiment from shimmery blue paper and I layered up all the elements of my card.
I added the Snowflake Brads and also used one to embellish the bow.
I love, love, love how this card turned out! 
Shopping List: 

Thank you so much for hanging out with me! 

Xoxo, Kim

Wednesday, January 4, 2023

Let It Snow!

Hi friends!  I am here with another super fun 3-D project that I created using several of the new Kat Scrappiness products! 

I really, really love the 3-D Pop Up Box Die, as it makes it so easy to create a beautiful, sculpted project that also folds flat to fit in an envelope. 

I die-cut all of the elements for the Pop-Up Box from blue card stock, assembled it and set it aside. I die-cut a whole ton of snowflakes using the new Snowflake Trio Dies.  The trio is three different sizes of snowflakes that you can layer or using them individually.  As you can see, I layered some, and left some by themselves. 
I used the Stitched Uppercase Alphabet Dies to die-cut the letters to spell "snow" and I adhered them to the front of the box.  I adhered the snowflakes to strips of acetate in graduated sizes and adhered the strips to the backs of the box layers.

To finish up my card, I embellished the heck out of the snowflakes using the Clear AB Glass Bubble Mix and added some snowflakes sequins from the Glistening Christmas Trees Sequin Mix and the Snowflake Parfait Sprinkle Mix.  Lastly, I added an iridescent white bow.
I hope you love this project as much as I do!  It really was a lot of fun to make.  Please make sure to head to the shop and check out all of the amazing products!
Thanks so much for spending a few minutes with me!  
Xoxo, Kim

**Affiliate links provided at no additional cost to you.  Thank you so much for supporting my hobby!**


Thursday, December 29, 2022

Time for Hot Cocoa!

 Hi friends.... bet you thought that I was done sharing Christmas cards!  Nope, not yet, although this one is really more winter themed than Christmas!  

I created a fun pocket card using the fabulous Scandinavian Christmas Collection from Keep it Simple Paper Crafts.  I love these cards because they provide an opportunity to use several different patterned papers!  
I colored up the cute little snowman and mittens from the Santa & Friends stamp set and used the coordinating dies to cut them out.  Before gluing the exterior flap down, I wrapped it with embroidery thread and baker's twine, and added a loopy bow. 
I hope that you are warm and snuggly inside!  This card makes me want to whip up a cup of hot cocoa and curl up in front of the fire! 
Thanks so much for spending a few minutes with me! 
Xoxo, Kim


Saturday, December 24, 2022

Warm Winter Wishes from Spinach & Ramona

Hello again, friends!  This is almost my last Christmas project, I promise!  

The first stamp set that I ever purchased from Prickley Pear Stamps was the darling Frog Pals - Spinach and Ramona stamp set.  I love this stamp set so much, and even more so after Sharon shared with me that Spinach and Ramona are their granddaughter's pet frogs!  How cute is that?    Anyhow, I was dying to dress them up for Christmas and create a card with them.

I colored them with Copic markers in traditional Christmas colors and added some gold accents using a gelly roll pen. I cut them out using the coordinating dies and set them aside. 

I created a layered tree using my Cricut, and I added some sparkle embossing paste that is nearly dried up to add snow.  I am loving the consistency of it for winter scenes, so I can't bear to throw it away, even though it is on its last leg.   
I tore two strips of white paper to create hills, and added the embossing paste to them, and set the wet items aside to dry completely.   I dry-embossed a white panel using a snowflake embossing folder from my stash and layered the panel on a piece of patterned paper.
I heat embossed a sentiment from the Santa and Rudolph stamp set and backed it with red glitter paper.   I adhered all of my elements to the card front and completed my card by adding some glass bubbles and a bow from my favorite ribbon.  I have had this ribbon in my stash for probably 20 years.  How crazy is that?! 
I have to say that this is my absolute favorite card that I have ever made!  I love all of the different texture, and of course the sweet frogs! 
Make sure to head to the shop and check out this sweet stamp set, and all of the other amazing goodies! 
Thank you so much for spending a few minutes with me!  I hope you love this card as much as I do! 
Merry Christmas to you and yours! 
Xoxo, Kim

**Affiliate links provided at no additional cost to you.  Thank you so much for supporting my hobby!**


Wednesday, December 14, 2022

Silent Night!

Hi friends!  I am up on the Kat Scrappiness Blog today, and I am so excited to share a card I made using some of the amazing products from the latest release!   I am a huge fan of the beauty in nature, and I feel that this card represents that so well! 

Here is how I made this card!

  1. I die-cut a panel for my card front using the Birch Tree w/Cardinal Backdrop Die
  2. I added a shimmery white embossing paste to the die-cut panel, and I love the effect that it gave.  I then set it aside to dry completely.
  3. When the panel was dry, I adhered it to a white card base.
  4. I die-cut the cardinals from a deep red cardstock and adhered them to the branches.  
  5. I die-cut one of the deer from the Reindeer Duo Dies from dark brown card stock and adhered it to the front of the card.
  6. I used a sentiment from the Simple Sentiments Stamp & Die Bundle and backed it on holographic cardstock.
  7. I tied a loopy bow from iridescent embroidery floss and added it behind the sentiment panel and then popped the panel up on foam dots.
  8. Lastly, I pulled out some of the snowflake sequins from the Glistening Christmas Tree Sequin Mix and added them to the card front.
Make sure to head over to the shop to check out the full release!  You will not be disappointed!   Don't forget that all Christmas products are 10% off through December 24th with code CHRISTMAS10

I hope that you love this card as much as I do!  It was so incredibly much fun to create, and was really quite easy, as the dies did all of the hard work!

Thanks so much for spending a few minutes of your day with me!  

Xoxo, Kim

**Affiliate links provided at no additional cost to you.  Thank you for supporting my hobby!**


Friday, November 25, 2022

Walking In a Winter Wonderland!

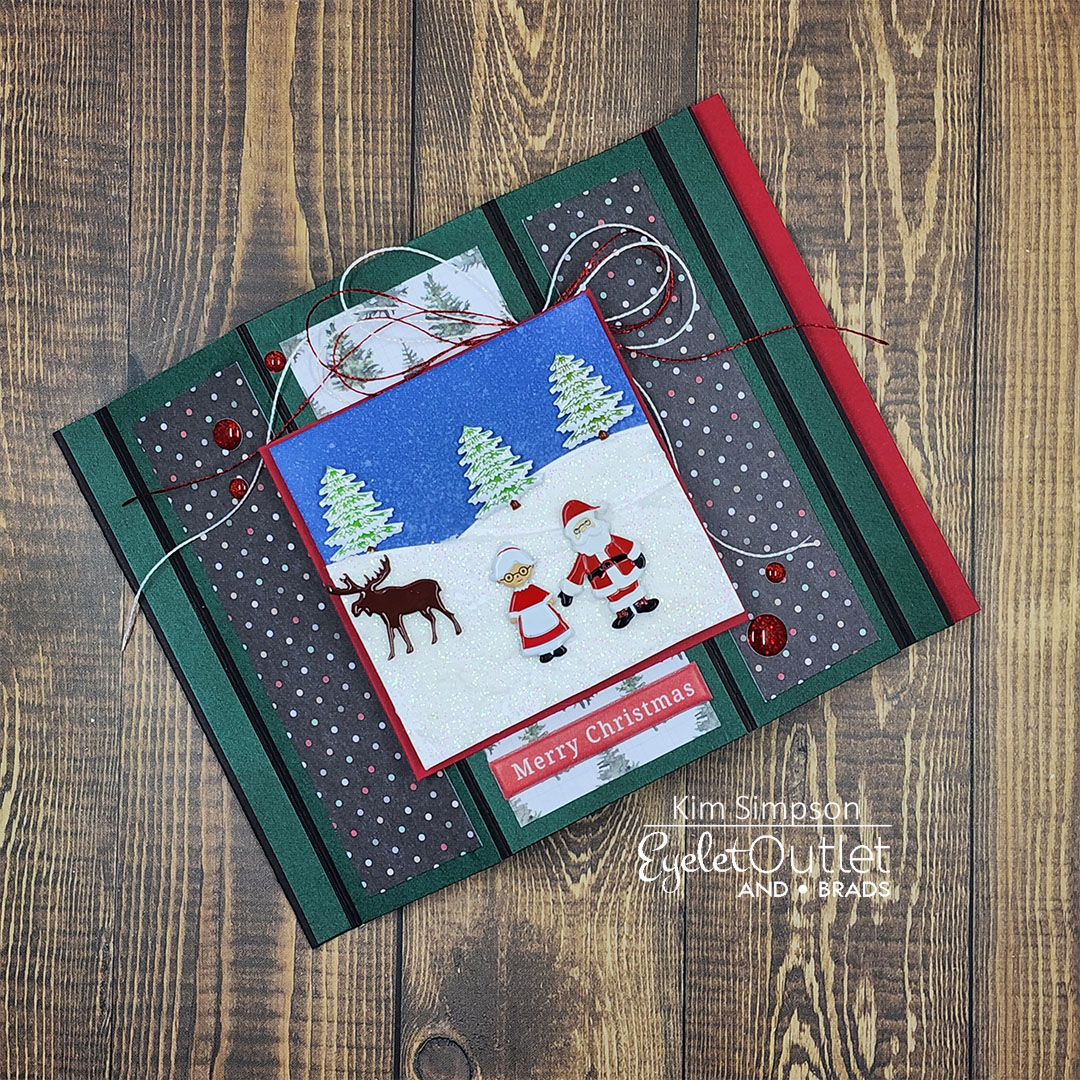
 Hello, friends!  Today, I am over on the Eyelet Outlet Blog, and I wanted to make sure that I shared this card here, too!!  A week has passed since my last Eyelet Outlet post, and I have made a little more progress on my Christmas cards.  How about you? 

A few weeks ago, my crafty friends @lvhandcrafted, @stamprgrl, and I had the pleasure of doing a Live Mystery Craft Along (MCA) and Linh taught us a new fun-fold technique.   If you missed the live event, you could still catch the replay (Make sure to hit that subscribe button while you are there!)!  I had so much fun creating this Bay Window card (I had never used this fold before) starring a little winter wonderland scene that I made using some of the amazing winter/holiday brads that are in the shop (see my shopping list below for the links).
I started with a square of Bristol Smooth card stock and I ink-blended the entire square using Distress Oxide Ink in Chipped Sapphire.  I did several rounds of spritzing it with water to add the snow fall to the sky.  I die-cut some hills using a die that I have in my stash, adhered them to the square and trimmed the edges off.  I added some sparkly texture paste to the hills.  My tub is nearly dried out, and it has been retired, so I need to find another sparkly paste that I like.
I then added the brads to the panel to create my scene.  To complete my card, I added my favorite - the Glitter Enamel Dots in red!  I couldn't believe how cute this turned out. 
I love this card fold, as it folds flat for mailing, but it stands on its own, and the possibilities are endless!
Shopping List: 

Tree Brads - Snow

Santa & Mrs. Claus Brads

Moose Brads

Glitter Enamel Dots - Red

Thank you so much for hanging out with me! 

Xoxo, Kim

Tuesday, April 12, 2022

Artful Angel DT - Kraftin' Kimmie - Holiday Bears

 Hello lovelies!  I am here to share some projects that I made for Artful Angel this week.  I was so inspired by a blog post by Norine Borys about using mini stamps on cards.  I don't know about you, but I struggle with knowing how to use my small images, so they tend to sit unused in the package. 

I decided to challenge myself to use the little itty-bitty stamps in the Kraftin' Kimmie Holiday Bears stamp set and to use the Norine's layouts as sketches for my cards.  It opened up a whole new world for me.   I wanted to share with you just how easy it was to make these cards in case this is a struggle for you, too!  Keep scrolling for a super fun bonus card at the end using this same stamp set. (I might have gone a little crazy, once I got going with these little cuties!)   I created 3 cards, each with one image from the stamp set as the focal point.  They were all relatively quick and easy to make and I can't believe how cute they turned out! 
To start, I stamped all of the images and colored them with alcohol markers.  I used a combination of Stampin' Blends from Stampin' Up (because I wanted the colors to coordinate with my card stock, and my selection of blue Copics is a bit limited) and Copic markers.  The colors will be listed below.  
For the first card, I used the Stitched Indented Rectangle Dies from Elizabeth Craft Designs to die-cut the panel for my image.  I then stamped my image and sentiment and then colored the image.  I die-cut another panel using the next largest die in the set.  I adhered them to a panel from the Echo Park Winter Magic 6 x 6 Paper Pad.  To finish, I added a bow made from silver metallic thread. 
For the second card, I stamped my image in the lower corner of a 3 3/4" x 5" panel of white card stock and colored it.  I stamped the sentiment on the panel.  I embossed the snowflakes from the stamp set in a mostly random fashion, using WOW Vintage Peacock Embossing Powder.  To finish, I layered it on a panel from the Carta Bella Winter Market 6 x 6 Paper Pad. 
For all of these images, I used the same color palette, so I didn't have to come up with different color blends.  I really wanted to keep it super simple. 
For the third card (which just might be my favorite), I embossed the sentiment in white on a scrap of Navy card stock and trimmed it down.  I had an extra die-cut from my "bonus card" that I layered behind the sentiment tag as a snow drift in order to ground my image and not have the little cutie "floating".  I used a piece from the Carta Bella Winter Market 6 x 6 Paper Pack for my background and then layered up my elements.  
Oh, yeah!  I said I had a bonus card for you!  I recently purchased the new Lawn Fawn Platform Pop Up Dies and had so much fun making a birthday card for my hubby that I wanted to try again, and I thought that these little bears would be PERFECT to create a scene with!   The fun thing about this die set is that after it is assembled and decorated, it folds flat and fits in an A2 envelope. 
When I stamped my images for the cards, I also stamped all of the images from the stamp set, as I knew I wanted to use them all for the Pop Up!  I colored them using the same colors, and then cut them all out.  I heat embossed some of the sentiments on blue card stocks and set them all aside. 
I used two sheets of the snowflake paper from the Carta Bella Winter Market 6 x 6 Paper Pack to die-cut the Platform Pop Up base.  I die-cut the remaining pieces from card stock and I assembled the Pop-Up.  Lawn Fawn has an excellent video tutorial for assembling the card here
Once I had my card assembled, I started playing with the placement of the images until I was happy and then I adhered them in place with liquid glue and embellished the outside of the card.  I love how it turned out!  
Colors Used:
Bears:  N2, N1, N0, R30, R000
Bear Outfits:  Stampin' Blends (all Dark and Light) - Night of Navy, Misty Moonlight, Seaside Spray, Balmy Blue
Sled/Snowshoes:  E18, E15
Birds:  E51, E51, YR04
Snowballs:  BG11, BG10, C1, C0, 0
Spectrum Noir Sparkle Pen
This is all four of the cards together.  This was really a quick and easy effort and I now have 4 cards ready for winter!  I hope that you have found something that inspires you to get crafty and maybe try to tackle something that may have been a struggle for you!  
Thanks so much for hanging with me!  
Xoxo, Kim

Friday, January 14, 2022

Sunshine Delights Coffee - Polkadoodles Craft Challenge Week 3

 Happy FriYay, crafty friends!  I am so excited to share that we have another Anything Goes Challenge up on the Polkadoodles Challenge Blog!  

For week three, the Design Team was challenged to create a winter "cheer-up/smile" card, so I immediately thought of coffee!  Coffee makes everything better for me and it certainly always puts a smile on my face!  

For my card, I really mixed things up.  I used several products from the darling Winnie Sunshine Delights Collection, along with a digital paper from the Winnie Winterland Collection

To create my card, I colored up the Sunshine Delights Coffee - Winnie digital stamp using my Copic markers and cut her out.  Before setting her aside, I added some white details using a Sakura Gelly Roll pen, and I used Wink of Stella to add some shimmer to the bow, hem line and shoes.  To add a bit of interest, I added some Nuvo Crystal Drops (Morning Dew) to the cup of coffee. 
I distressed the edges of all of my papers using Distress Ink (Vintage Photo) and I layered them up. I used one summery paper, and one wintery paper, hopefully as a reminder that winter won't last forever! I also used a sentiment from the Winnie Sunshine Delights collection that I felt completely fit the message that I was wanting to send! 
To complete my card, I added some gold metallic thread and a little wooden coffee button that I have had lying around for a knitting project that has never come to be.  I thought that it would be the perfect finishing touch for this card!  


I hope that you will hope on over to the blog to see all of the other beautiful projects that the Design Team has created to inspire you!  Make sure to leave them some love, and please share your projects with us!  Remember, in an Anything Goes challenge, there are no product requirements!  Use what you've got!  Also, there are some amazing prizes up for grabs! 
Thanks so much for stopping by! 
XOXO, Kim

Wednesday, December 8, 2021

Guest Designer - Make the Cards Challenge #44

Good morning, friends!  There is a new challenge up over at Make the Cards Challenge and this week is all about WINTER! 

I was so excited for this challenge week, as I knew I wanted to create a blustery shaker card... Where I live, I saw my first few snowflakes this week.  Of course, nothing stuck around, as it is still slightly too warm, but soon! 

For my card, I used the Lawn Fawn Peppermint Stripes Backdrop Die and backed it with a sheet of acetate.  I also adhered a panel of Stampin' Up Feels Like Frost DSP (possibly retired) to the front of my card base.  I used foam adhesive strips to build up the back of my shaker window.  I used the strips, rather than my roll of foam tape because it is much thinner and didn't result in ragged ends from cutting the tape. 

I created my own shaker mix using an assortment of chunky glitter and slices that I purchased from my local Michael's and adhered my shaker window to my card base. 

I die-cut the fabulous Giant Let It Snow Die from Lawn Fawn twice and glued the pieces together.  I also die-cut an assortment of snowflakes using two sets of retired snowflake dies from Stampin' Up.  I painted some shimmer on all of my die-cut elements using my Spectrum Noir Sparkle Pen and then adhered them to my card front. 

For a really quick and easy card to put together, it is absolutely stunning and represents all of the things I love about winter!  

Please make sure to join us over at Make the Cards Challenge and tag us in all of your social media posts using #mtcc, #mtcc44, and #makethecardschallenge!

Thanks so much for stopping by!  I can't wait to see what you create!