Showing posts with label Fun Fold Cards. Show all posts

Saturday, February 4, 2023

A Fun Pop-Up Shaker Card!

 Hi friends!  Today, I am sharing a fun 3-D card that I created using some amazing Kat Scrappiness products! 

My crafty friends, LV Handcrafted and StamprGrl and I get together regularly to have some LIVE crafty shenanigans and our last Mystery Craft Along was a total blast!  Linh (LV Handcrafted) led us in creating a mystery fun-fold card and this was the result - a Tuxedo Pop Up Box Card.  We had no idea what we would be making, but by following her clues, we made this super cool card! 

I decorated my card using the Heartfelt Wishes Slimline Paper Pad.  I created several heart shakers using the Love In Stitches Shaker Card Dies and I used the same dies to cut a few plain hearts.  I filled the shaker elements with 6mm Metallic Red Solid Heart Sequins and Sparkling Clear Diamond Jewel Mix

I am so glad that Linh showed us how to create this fun card!  I had never even heard of this fun-fold before! 
Please make sure to head over to the shop and check out these fun products that I used!  They are PERFECT for all of the Valentines that you will be making! 
Thanks so much for spending a few minutes of your day with me!  
Xoxo, Kim

**Affiliate links provided at no additional cost to you.  Thanks so much for supporting my hobby!**


Thursday, December 29, 2022

Time for Hot Cocoa!

 Hi friends.... bet you thought that I was done sharing Christmas cards!  Nope, not yet, although this one is really more winter themed than Christmas!  

I created a fun pocket card using the fabulous Scandinavian Christmas Collection from Keep it Simple Paper Crafts.  I love these cards because they provide an opportunity to use several different patterned papers!  
I colored up the cute little snowman and mittens from the Santa & Friends stamp set and used the coordinating dies to cut them out.  Before gluing the exterior flap down, I wrapped it with embroidery thread and baker's twine, and added a loopy bow. 
I hope that you are warm and snuggly inside!  This card makes me want to whip up a cup of hot cocoa and curl up in front of the fire! 
Thanks so much for spending a few minutes with me! 
Xoxo, Kim


Sunday, December 25, 2022

Happy Holidays from the Artful Angel Team!

Merry Christmas!  Today, the Artful Angel Design Team is doing an Instagram Hop.  I decided to make a Christmas card using a non-Christmas stamp set, and my mind instantly went to the Stand Tall stamp set!  I just love these giraffes and they were so fun to turn into Christmas critters! 

I colored them with Copic Markers, and I colored their hooves, spots and little nubs in Christmas colors.   I cut them out and I set them aside to construct my card.   I created a fun fold and I have no idea what it is called, or where I found it, but I did not invent this. 
Here is how I made the card: 
1.  Cut your card base to 4 1/4" x 11", scored at 5 1/2".  
2.  Layer the front panel with patterned paper.
3.  Before adding patterned paper to the inside of the card, add some ribbon to both sides to allow you to tie the card shut.  
4.  Add patterned paper to bot side s of the inside of the card.
5.  Cut your inner panels - my largest square is 2 1/2" x 2 1/2", and then I layered some smaller squares.
6.  Cut a strip of card stock 1" x 10" and score at 2 1/2", 5", and 7 1/2".   The folds from L - R will be valley, mountain, valley.
7.  Decorate the card front as desired
8.  Adhere the squares to the folded strip as shown in the above photo.  The strip should be adhered to the center of each square.
9.  Adhere the two outer squares to the inside flaps of the card. 
Voila!  You have created a super fun pop-up like card! 
Anyhow, make sure to head over to Instagram and hop along with us! There is a prize up for grabs! 
Thank you so much for spending part of your Christmas with me! 
I hope that your holidays are filled with love and laughter! 
Xoxo, Kim

**Affiliate links provided at no additional cost to you.  Thank you for supporting my hobby!**


Friday, November 25, 2022

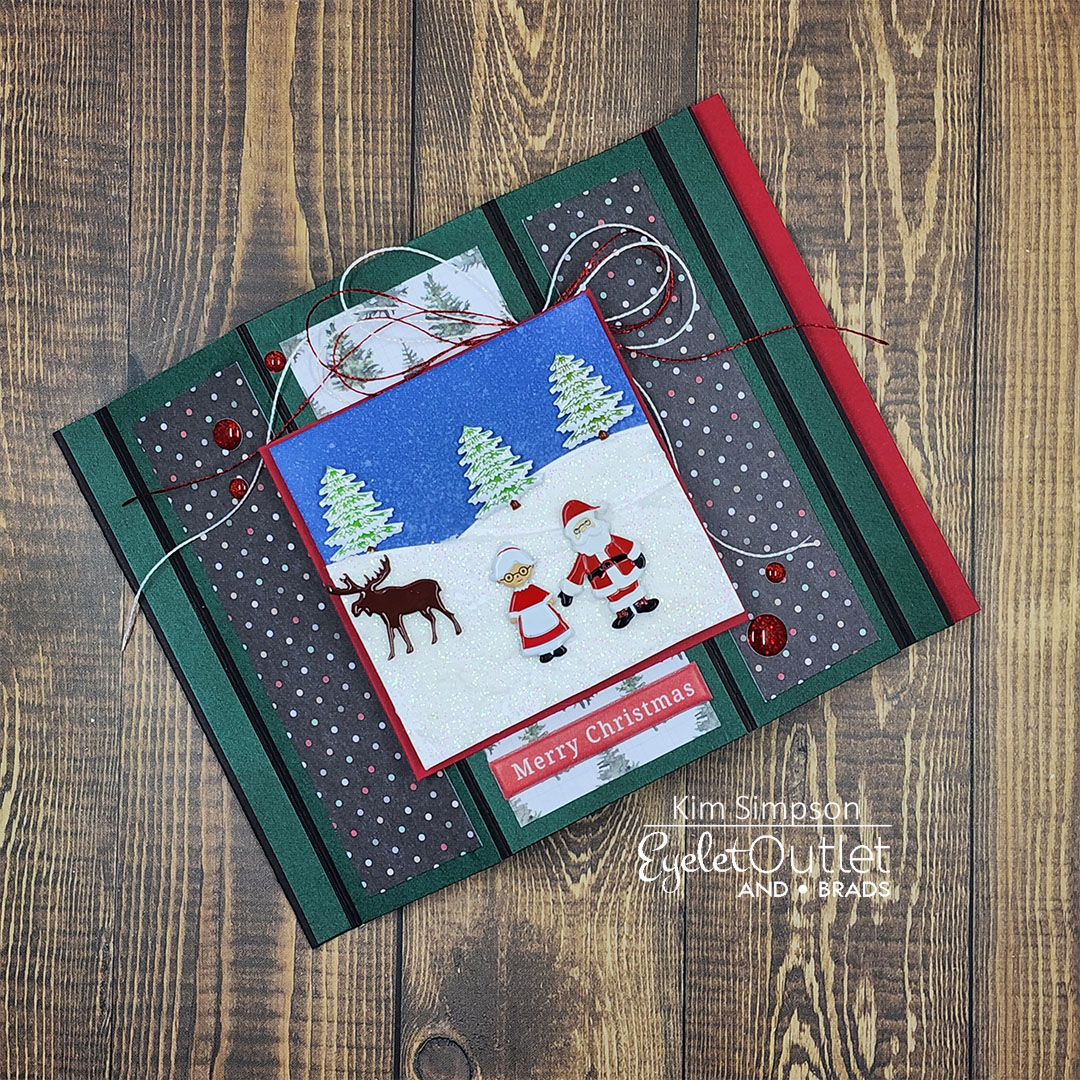
Walking In a Winter Wonderland!

 Hello, friends!  Today, I am over on the Eyelet Outlet Blog, and I wanted to make sure that I shared this card here, too!!  A week has passed since my last Eyelet Outlet post, and I have made a little more progress on my Christmas cards.  How about you? 

A few weeks ago, my crafty friends @lvhandcrafted, @stamprgrl, and I had the pleasure of doing a Live Mystery Craft Along (MCA) and Linh taught us a new fun-fold technique.   If you missed the live event, you could still catch the replay (Make sure to hit that subscribe button while you are there!)!  I had so much fun creating this Bay Window card (I had never used this fold before) starring a little winter wonderland scene that I made using some of the amazing winter/holiday brads that are in the shop (see my shopping list below for the links).
I started with a square of Bristol Smooth card stock and I ink-blended the entire square using Distress Oxide Ink in Chipped Sapphire.  I did several rounds of spritzing it with water to add the snow fall to the sky.  I die-cut some hills using a die that I have in my stash, adhered them to the square and trimmed the edges off.  I added some sparkly texture paste to the hills.  My tub is nearly dried out, and it has been retired, so I need to find another sparkly paste that I like.
I then added the brads to the panel to create my scene.  To complete my card, I added my favorite - the Glitter Enamel Dots in red!  I couldn't believe how cute this turned out. 
I love this card fold, as it folds flat for mailing, but it stands on its own, and the possibilities are endless!
Shopping List: 

Tree Brads - Snow

Santa & Mrs. Claus Brads

Moose Brads

Glitter Enamel Dots - Red

Thank you so much for hanging out with me! 

Xoxo, Kim

Saturday, November 5, 2022

Happy Birthday, Gnomie!

Happy Saturday, friends!  You know what that means!  We have a new Anything Goes Challenge live on the Polkadoodles Crafting Blog!  This week the Design Team challenge was to create an easel birthday card using fall colors of browns and greens.  

I colored the adorable Autumn Wheelbarrow Halloween Gnome digital stamp with Copics (listed below), cut it out and set it aside.  
I started with a brown card base and layered several different cardstocks, including a digital paper (and I am sorry, but for the life of me, I can't remember which collection I pulled it from).  I inked the edges of all of the layers with Distress Ink. 
I wrapped a piece of burlap ribbon around the layers and before adhering it to the card base, I added a row of Stitched Flower Brads along the bottom.  I had to get a little bit creative with my main image, as the gnome is holding a jack-o-lantern on a stick.  Since Halloween is over, I covered it with a Sunflower Brad.  I also added some Stitched Flower Brads along the bottom of the panel. 

I stamped my sentiment on the inside of the card, and popped the "to you" panel up with foam tape so that the card front could rest behind it when popped open.  To complete my card, I created a loopy bow using some thin grosgrain ribbon paired with linen thread.  I cut the prongs off of a pumpkin brad and used my hot glue gun to make a "button" for the bow.  I also added some Chocolate Jewels from Kat Scrappiness to add some sparkle.
Colors Used:
Skin - E04, E11, E21, E00, E000
Beard - C9, C7, C5, C3, C1, C0
Green - G99, YG67, YG63, YG61
Brown - E29, E27, E25, E23, E21
Yellow - YR27, YR14, YR15
Blue - B29, B26, B24
Orange - E09, E99, E97
100
Misc. Shopping List:
I hope you are inspired to get out your craft supplies and try something new!  Make sure to share it with us on the Challenge Blog and be entered to win some amazing prizes!  
Thank you so much for spending a few minutes with me! 
Xoxo, Kim

Tuesday, October 25, 2022

Who's Ready For the Holidays? Not This Girl!

Hi friends!  It is Release Day over at Artful Angel and we are celebrating with an Instagram Hop! 

 I created a really fun card to share with you, starring the Santa's Crew Stamp Set. This set is really fun and really versatile, as it can be used not only for holiday cards, but for winter cards, which is something that I look for in my stamp sets!  

I colored up the beautiful reindeer with Copic Markers (listed below) and cut him out to set about making a Circle Gate Fold Card. 
I started with a base of 100# red cardstock, paired with Stampin' Up Garden Green cardstock along with some retired DSP from Stampin' Up.  I have been hoarding this paper because I love it so much, but it was perfect to be paired with this gorgeous image.
I embossed one of the sentiments from the brand-new Big Christmas Stamp Set in white and created a banner out of it.  I adhered the banner behind the deer and popped the deer up on foam squares.  I added a loopy bow of red and white metallic embroidery thread and finished up with some White AB Glass Bubbles from Kat Scrappiness.
Colors Used: 
E29, E25, E23 E21
E55, E53, E51, E50
W6, W4, W2, W0
White Gelly Roll Pen
Make sure to head over to the Artful Angel shop to check out the new release!  You will not be disappointed.  Then, you will want to head over to the Instagram Hop and join in! Look for this graphic: 

Follow the instructions and be entered into the giveaway!   You will love all of the inspiration that this amazing Design Team has created for you!  
Thanks so much for stopping by! 
Xoxo, Kim

**Affiliate links provided at no additional cost to you.  Thank you for supporting my habit, I mean my hobby!**


Saturday, October 22, 2022

Merry Chris-Moose!

Hello friends!  Oh my gosh!  This project marks one year on the Polkadoodles Design Team for me!  Time sure flies!  It's Saturday, and we have a new Anything Goes Challenge up on the blog today!   

This week the Design Team was challenged to create a pocket card with a snowman.  I had never made a pocket card before, but I had a lot of fun with this one!  

I colored up the adorable Snowman digital stamp from the Elvis Wesley Moose collection with Copic Markers (colors listed below) and set it aside. 

I created my card with a heavyweight base paired with some of the fun digital papers from the Elvis Wesley Moose Collection.  I inked the edges of the papers up with Walnut Stain Distress Ink before adhering them to my card.  
I die-cut my image using into a square panel and adhered it to the card front.  I then created a tag to go into the pocket that is perfect for writing a message to the recipient.  Lastly, I added a bow and some Clear AB Glass Bubbles from Kat Scrappiness. 
Colors Used: 
Red - R59, R37, R35, R32
Violet - BV08, BV13, BV02, BV00
Green - G09, G07, G05, G02
Blue - B14, B12, B00, B000
Brown - E29, E27, E25, E23, E21, R20 (for lighter color, I dropped E29 and E27)
Orange - YR09, YR07, YR04
Black - 100, C8
Snowman/Snow - C1, C0, B00
I do hope that you love this card as much as I do!  I would love to know if you have a favorite pocket card that you create, and if you have a link to it, please drop it!  
Make sure to share your latest creation with us over on the blog and be entered to win some amazing prizes! 
Thank you for stopping by! 
Xoxo, Kim

Sunday, October 2, 2022

For 10/2 - Dream Big, Little Cowgirl!

Good morning, friends!  I hope that your week is off to an amazing start. 

Today, I am sharing a fun Book Fold card starring the adorable Little Cowgirl Birthday Collection from Keep It Simple Paper Crafts.

I really love this fold, because it is super simple, but incredibly fun.  I paired two of the papers from the Little Cowgirl Birthday 6 x 6 Paper Pack with some lilac card stock. 
I heat embossed the sentiment from the Little Cowgirl Birthday - Sentiments stamp set and die-cut it.  I popped it up on the card front with foam dots and added the sweet bunny die-cut from the Little Cowgirl Birthday - Die-Cut Pieces by doubling the foam dots.  I added some white linen thread and lilac ribbon, along with some Pastel Heart Enamel Dots from Eyelet Outlet.
Here is a look at what makes this card fold so fun! 
I hope that you love this card as much as I do!  It was so much fun to create, and it was really quite quick.  Please make sure to head over to Keep It Simple Paper Crafts and check out the whole collection!  
Thank you so much for stopping by! 
Xoxo, Kim

Friday, September 30, 2022

Work Hard, Dream Big!

Hi crafty friends!   I know that we have already established that I hate housework.  Who's with me?   I do think that if I had the help of these adorable Chore Gnomes from Keep It Simple Paper Crafts, I might not mind so much.  OK, let's be real.... I would still hate it! 

I sure did love creating this adorable fun Double Z Fold Card using this fabulous collection! This was a mostly simple card to create, thanks to the die-cut embellishments and perfectly coordinated papers in the collection. 

I paired several of the patterned papers from the Chore Gnomes 6 x 6 Paper Pack with red, yellow, and navy cardstock.  I really enjoyed working with the primary colors - they are just so cheerful.  I inked up the edges of all of my panels using yellow distress ink before adhering them.
I used one of the gnomes and a few of the cleaning supplies from the Chore Gnome Die-Cut Pieces and stamped the Work Hard Dream Big sentiment from the Work Hard Stamp Set in navy blue. To complete my card, I added some enamel dots from the Back to Basics  - Royal Enamel Dots.
I really love this card!  I especially love that it stands on its own, but it folds flat for mailing!  
Please head over to the Keep It Simple shop and check out the collection! 
Thanks so much for stopping by! 
Xoxo, Kim

Thursday, September 15, 2022

Bless Your Heart!

Howdy partner!  I am here to share another fun card from the Little Cowgirl Birthday Collection from Keep It Simple Paper Crafts.  This might seriously be my new favorite collection!  

I made a fun fold card that was inspired by @stampin_heidi.  She calls it the Vertical Double Fold card.  When I saw it, I knew it was perfect to show off these amazing, patterned papers! 

This card came together pretty quickly because I used one of the die-cut embellishments as my focal image.  Folded flat, the card is a standard A2 size (4 1/4" x 5 1/2"), but when opened, it is 4 1/4" x 11".

The card opens up into 3 sections, and the last section is suitable for writing a message on. 
I used the Stitched Indented Squares dies from Elizabeth Craft and inked those panels up with So Saffron ink.  I popped the die-cut embellishment up on foam squares, added a loopy bow and some enamel dots. 
Shopping List: 
You really need this adorable collection!  It is just so versatile!  Please come join us in the Keep It Simple Paper Crafts Group on Facebook!  Check out all of the amazing inspiration that the Design Team has created!  Let me tell you, it is something else!  
Thanks so much for stopping by! 
Xoxo, Kim

Tuesday, September 13, 2022

Down Syndrome Awareness - Homie with an Extra Chromie!

Hi friends!  Recently I hosted another Mystery Craft Along event with Artful Angel and we had so much fun!  For this month's event, we created a Joy Fold Card with a twist.  I decided to create a square card that opens vertically, rather than the traditional horizontal opening.
I colored up the sweet hand in hand image from the Extra Chromie stamp set, cut it out, and set it aside.  I loved the Perfect2Me digital paper collection from AZRedHead that I found on Etsy and had used previously, so I used some of the other papers that I hadn't used previously for this card.

I love how the Joy Fold card is always a surprise when I open it!  It's a little mini card on top of a card!  How fun is that?!  

If you haven't participated in one of our Mystery Craft Along events, you really need to.  It is so much fun!  Make sure to join the Artful Angel Takes Flight group so that you are notified of upcoming events. 
Thanks so much for stopping by! 
Xoxo, Kim
 

Thursday, August 11, 2022

Artful Angel July Release - Stand Tall

 Hey friends!  I have been dying to share this card that I created for the July Release over at Artful Angel!  I created a Twist Pop Up Card using the adorable Stand Tall and High There stamp sets. When I saw this stamp set, I knew exactly who I needed to make a card for, and I wanted to do something extra!  I found a tutorial on YouTube from Maymay Made It.  It was so incredibly fun and easy to make!  Ok, enough yammering... let's get to the details!  

I started by coloring up the cute giraffes in the stamp set with Copics (colors listed below), cutting them out and setting them aside to create the card.  
Seriously, this card is magical!  It makes me smile every time I look at this!  I decided to start with a base of kraft card stock and combined it with some olive green card stock and some super cute digital papers from Scrapbook Gem's In the Wild kit.  
For the front of the card, I needed some jungle leaves, so I used the Lawn Fawn Magic Iris Tropical Leaves Add-On and I added a stitched circle die-cut.  I distressed the edges of most of the panels using Vintage Photo Distress Oxide Ink.  I adhered the giraffe and added a jute bow to his neck. 
For the inside, I distressed the edges of the panels, stamped my sentiments and adhered the giraffes to the two end panels.  Funny story, after I had finished this card, I found out that there are dies that will do all the hard work for you.  ARE YOU KIDDING ME?  LOL... I did have a blast making this though!  Keep reading to see the GIF I created of this card in action. 
Colors Used: 
Body:  E44, E43, E42, E41, R20
Spots:  E37, E33
Mouth:  R83, R81
Eyeballs:  C1, C0
I hope you have enjoyed seeing this card!  I am beyond pleased with how it turned out!  
Thanks so much for stopping by! 
Xoxo, Kim


Saturday, June 18, 2022

Twiggy & Toots Graduation - Polkadoodles Crafting Challenge - Week 25

 Happy Saturday, friends!  You know what that means!  It's time for a new Anything Goes Challenge on the Polkadoodles Crafting Challenge Blog!   This week the Design Team was asked to make a card that isn't in the shape of a square or a rectangle.  WHAT!?! This was such a challenge for me.  

My nephew is graduating this year, so I wanted to make a really fun card for him.  I decided that my card would be in the shape of a graduation cap.  I found a fantastic tutorial for a Graduation Cap Easel Card on YouTube from Sam Calcott of Mixed Up Crafts.  
I colored the adorable Twiggy and Toots Graduation digital stamp with Copic markers (colors listed below), cut out the image and set it aside, so that I could create the card.   This was a fun 3D card to make, and the tutorial was so easy to follow. I love that the back has a large amount of white space to write a message on. 

Colors Used: 
Eyes - Y26, Y23, Y21
Brow - E43, E41, E40
Wings - E79, E74, E70
Cap/Gown/Shoes - C10, C08, C06, C04, C02, C0
Soles - E79, E74, E70
Diploma - Y26, Y23, E43, E41, E40
Bow/Tassle - B69, B66, B63
I know that my nephew will probably not appreciate this card as much as the rest of the family will, but that's OK!  He is a teenage boy, after all.  He will know that he is loved! 
I hope that you will join us for this week's Anything Goes Challenge!  There prizes up for grab!  Please head over to the blog and share your creations with us! 
Thanks so much for stopping by! 
Xoxo, Kim