Showing posts with label Masculine Cards. Show all posts

Friday, February 3, 2023

For My Favorite Handyman!

 Happy Friday, friends!  Are masculine cards a struggle for you?  They sure are for me, and I never seem to have enough birthday cards for the guys in my life!  I created a super fun birthday card for my favorite handyman.  

I started by creating a background panel by alternating the Tool Washi Tape with strips of card stock that I die-cut.  I created my focal point by adding a large die-cut birthday sentiment to a piece of craft cardstock.  

Before adhering the panels to the card base, I added screw dies to each corner of the washi panel, and I used some toolbox and tool dies on the sentiment panel.  I then popped them up on the card base with foam dots.
Shopping List: 

Thank you so much for hanging out with me! 

Xoxo, Kim

Tuesday, January 3, 2023

Dance to the Music of Your Heart!

 Hello friends!  Have you been enjoying all of these fun Southwestern themed cards?

I created another fun card using the Kokopelli - Just Dance stamp set.  I really love the sentiments with this stamp set!  

I created a simple tag and heat embossed the focal image on it.  I paired it with some fun digital papers and heat embossed the sentiment and created a double-ended banner.
I finished up the card with a few Obsidian Black Rhinestones.
Thanks so much for hanging out with me for a few minutes!  Make sure to stop by the shop and check out the entire collection! 
Xoxo, Kim

**Affiliate Links provided at no additional cost to you.  Thank you for supporting my hobby!**

Wednesday, December 28, 2022

Happy Birthday, Southwestern Style!

 Hello, friends!  Over at Prickley Pear Rubber Stamps, we are so excited to be sharing the newest release with you - The Southwest Collection!

I had so much fun creating with this collection, that I made two cards to share with you today!  I love anything animals, so I really love the Southwestern Fun Stamp Set!   It is perfect for masculine cards, though it really works for any occasion!  

  Masculine cards are a huge struggle for me, and I never have birthday cards on hand for the guys, so this was a perfect opportunity to add to my stash.  I paired this stamp set with some fabulous digital paper that I found on Etsy.
Once I figured out what I was doing, these cards came together so quickly!  I heat embossed the animals on die-cut circles and set them aside.  I also heat embossed sentiments from the Kokopelli - Happy Birthday Stamp Set and cut the strip into a banner.  I wrapped my card panels with some champagne colored metallic embroidery thread and added a loopy bow. 
Please make sure to head over to the shop and check out the entire release!  You won't be disappointed!  Also make sure to head to the Prickley Pear Pals Facebook Group and keep an eye out!  The amazing Design Team will be sharing their inspiration with you all week.
Thanks so much for spending a few minutes with me!  
Xoxo, Kim

**Affiliate links provided at no additional cost to you.  Thanks so much for supporting my hobby!**

Saturday, October 22, 2022

Wood You Be Mine?

 Happy Saturday, friends!  I hope your weekend is off to a great start.  Today, I am sharing a fun-fold card that I created using the Keep It Simple Paper Crafts Lumberjack Collection. 

I saw a link to this tutorial for a Triangle Trifold Card by Twila Davis on Facebook and had to give it a try.  It was so much fun to create. 


It's really hard to explain the mechanics of the card, and I honestly don't know if I made it correctly, but I love it!  The triangles open up to a hidden panel inside with plenty of room to write a message. 
I paired a few of the patterned papers from the Lumberjack 6 x 6 Paper Pack with a whole bunch of the die-cut embellishments from the Lumberjack Collection Die-Cut Pieces and the Lumberjack Cards & Ephemera Die-Cut Pieces along with some die-cut circles that I inked up.  
I think this would be a perfect Valentine's card for your favorite guy!  What do you think? 
Thanks so much for stopping by! 
Xoxo, Kim

Tuesday, October 18, 2022

Channel the Flannel!

 Hi friends!  Today, I am sharing another fun card from the Keep It Simple Lumberjack Collection.  Have I mentioned that I absolutely LOVE this collection? 

I combined several of the patterned papers from the Lumberjack 6 x 6 Paper Pack with one of the die-cut embellishments from the Lumberjack Collection Die-Cut Pieces to create this fun card!
I die-cut a circle from the cloud paper and added some die-cut grass that I inked up and added a scalloped stitched circle as a border.  I inked up the base of the die-cut embellishment with the same green and adhered it to the panel.
I heat embossed the sentiment and punched a banner end and adhered it to the card front, followed by a loopy bow of metallic copper thread.  
I love how easily this card came together and it is just too cute! 
Thanks so much for stopping by! 
Xoxo, Kim

Monday, October 10, 2022

Let's Sleep Under the Stars!

Happy Monday, friends!  I hope your week is off to a great start.  I am so excited to share a card that I made for the brand-new release from Keep It Simple Paper Crafts - Lumberjack!  I seriously keep thinking that they couldn't do better, but each release just blows my mind!  This one is my favorite without a doubt!

When I saw the tents in the Lumberjack Collection Die-Cut Pieces and the sentiment, I knew that I wanted to ink blend a night sky and create a scene.  I don't know about you, but I have always struggled with ink blending.  I have never been happy with my finished result.  I have tried tons of different bases, but still never loved the result.  A short time ago, I saw a random post on Facebook about using Bristol Smooth Cardstock and how amazing the result it, so I headed out to my local craft store and picked some up.  Truly a game changer!  
I started out with a base of Bristol Smooth and I lightly blended Black Soot Distress Oxide Ink over the entire panel.  Next, I blended a band of Wilted Violet Distress Oxide Ink through the middle of the panel in a wave shape and added some Fossilized Amber to the upper right corner.  I blended some Faded Jeans along the bottom, but I wasn't happy with the color, so I blended Chipped Sapphire over the top of that.  Lastly, I went over the upper left corner with more Black Soot to make it stand out. 
I spritzed the panel with water, let it sit for about a minute, and laid a tea towel over the panel, using very light pressure to lift the water.  I did this about four times from different angles, and the last time, I zapped it with my heat gun.  I pulled out my splatter box and splattered some watered down Stampin' Up White Shimmer Paint over the panel and set it aside to dry. 
I die-cut some grass strips from green paper and then I added some flicks with my Copic markers for added texture.  I also trimmed down some of the die-cut embellishments so that there wasn't quite as much white border.  I added some flicks using the same Copics to the base of the fox and rabbit.  
I layered the ink-blended panel over a holographic cardstock panel (I LOVE THAT CARDSTOCK) and adhered them both to a navy-blue card base.  I arranged my scene and then adhered the elements down to the ink-blended panel. Lastly, I embossed the sentiment from the Lumberjack Camping stamp set in silver on navy card stock, layered it on holographic cardstock, trimmed the ends and adhered to the card front, followed by a loopy bow of navy and silver thread. 
I hope that you love this card as much as I do!  Head over to Keep it Simple Paper Crafts and check out the new Lumberjack Collection!  I promise that you will fall in love with it!  The Design Team will be sharing projects all week long, and you won't want to miss a single one, so you can come join us in the Keep It Simple Paper - Inspiration Facebook Group to be sure to catch them all! 
Thanks so much for stopping by!  
Xoxo, Kim


Saturday, July 16, 2022

PPC&F - Catherine Pooler - Pinecone Greetings

  Hello friends!  I am so excited that Catherine Pooler is our sponsor this week over at Passionate Paper Creations and Friends!  This is the second card that I created using her amazing products! 

For today's project, I made a masculine birthday card using the Pinecone Greetings stamps and dies, paired with the Plaid Background stamp.  My dad's birthday is in December, and I thought this would be perfect for a winter birthday.  I love this stamp set, as it is so versatile! 
This was my first-time using Catherine Pooler inks, and I can now understand why people rave about them.  The coverage is amazing, and my images stamped neatly and cleanly without much fuss! 
I hope that you will join us over in the PPC&F Facebook Group!  Catherine Pooler has graciously offered up a generous surprise for our members to use in their shop!  If you aren't a member, all you have to do is click the "Join" button, answer a few questions and you will also be able to take advantage of the surprise! 
Thanks so much for stopping by!  
Xoxo, Kim

Sunday, June 19, 2022

Happy Father's Day - The Greetery - Dad Jokes: High Steaks

 Hello friends!  I hope that you are doing something special to celebrate Father's Day today, at least if you are in the US, and if not, I hope you are doing something relaxing!

I wanted to pop in and share the card that I created for my dad.  Last May, The Greetery put out an amazing release, full of masculine items.  I pulled out the Dad Jokes: High Steaks stamps and dies to put together this fun card. 
I created a plaid background using the Plaid Background stamp from Catherine Pooler, and then I created a second layer by stamping the knife and sentiment in white chalk ink on navy card stock.
The steak and fork are a combination of stamps and die-cuts.  I hope my dad loves it.  Well, c'mon!  I know he will, because he loves anything I make for him.  Isn't that just like a dad?! 
I hope your day is amazing!  Thanks so much for stopping by! 
Xoxo, Kim


Saturday, June 4, 2022

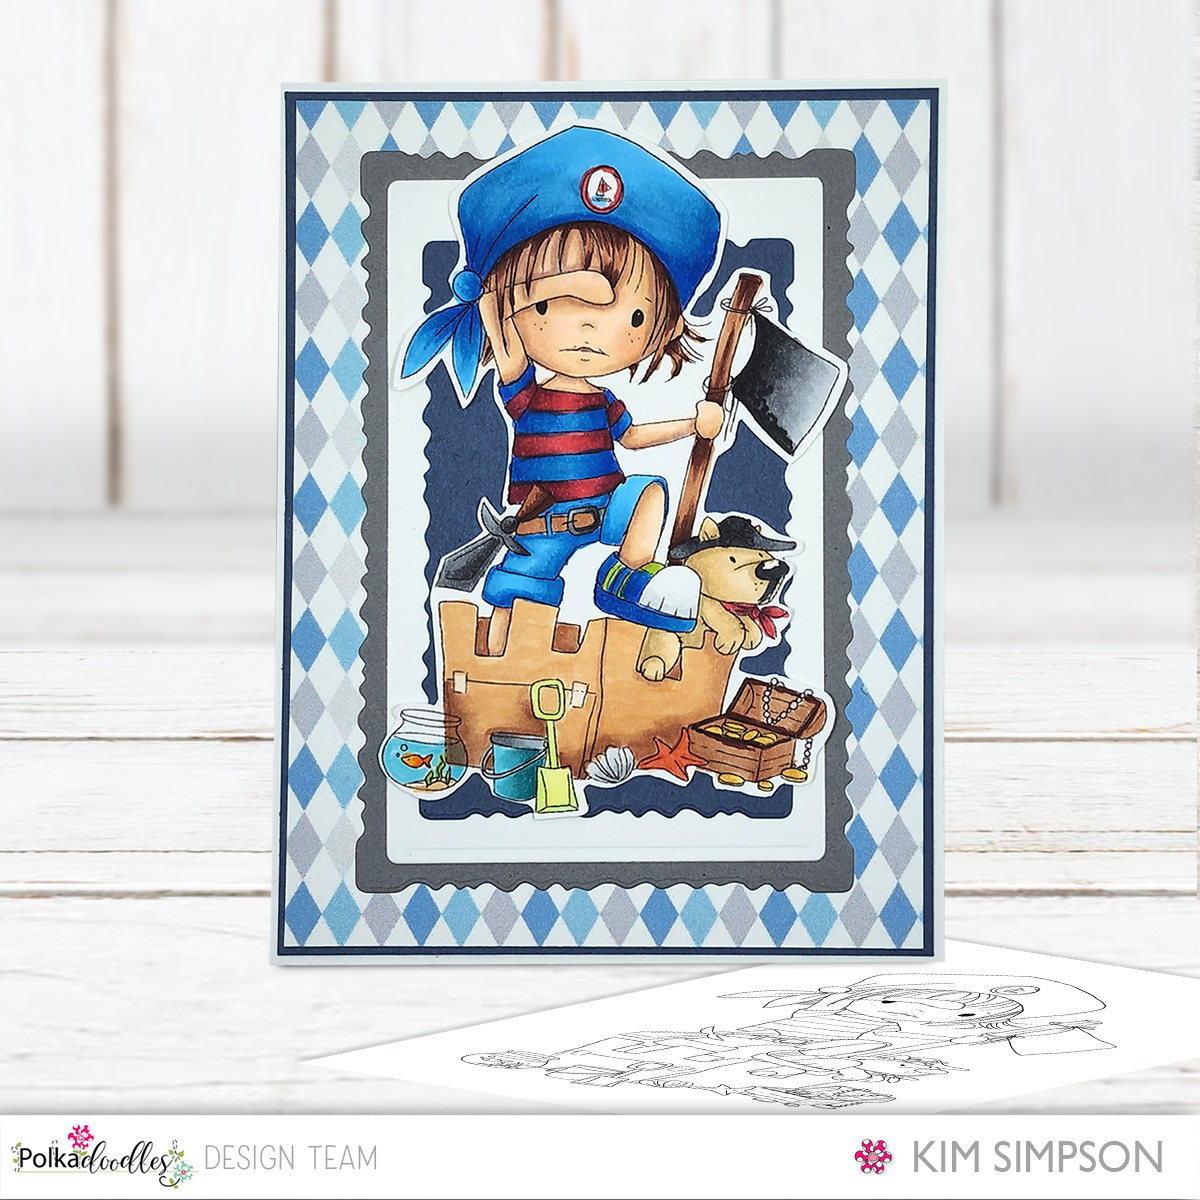
Little Dudes Pirate - Polkadoodles Crafting Challenge - Week 23

 Good morning, lovelies!  It's Saturday and that means we have a new Anything Goes Challenge up on the Polkadoodles blog! 

This week, we were challenged to create an easel card.  I wanted to try something different, and I found a Square Easel Fold Card tutorial by Gloria Plunkett, so I went to work creating!   I had so much fun coloring the Little Dudes Dragon Onesie, that I decided I wanted to make another card using this collection.  I colored up the Little Dudes Pirate with Copic markers (colors listed below), cut out the image and set it aside. 
I wanted to keep the color palette a bit subtle so that the image itself would stand out.  I used one of the digital papers that comes as a bonus with the digital stamp and then chose some solids that coordinated with the paper.  I used the Deckle Die Set from Stampendous to cut out the blue and gray panels.  

Lastly, I adhered one of the sentiments that is included with the stamp.  I just LOVE this little fella and the fact that the card folds flat and will fit in a standard envelope, and it stands on its own to display.  
Colors Used: 
Skin - E04, E13, E21, E00, E000, R20
Hair - E18, E15, E13
Denim - B16, B14, B12
Shirt/Dog Scarf - R59, R39, R35, B18, B16, B14, B12
Stick/Chest - E18, E15, E13
Coins - YR25, YR21, Y11
Sand Castle - E15, E13, E21
Pail - BG49, BG57, BG53
Fishbowl - YR07, YR04, YG25, ,E21, BG53
Shovel - YG11, YG00
Starfish - R05, R12
Shell - C01, C0, 0
Sword/Belt - E18, E15, E13, N9, N7, N5, N3
Dog - E55, E53, E51, N7
Please make sure to hop over to the blog and share your work with us!  There are prizes and bragging rights up for grabs, and because it is Anything Goes, that means that there are no product or theme requirements!  
As always, thank you so much for popping by! 

Xoxo, Kim


Saturday, May 21, 2022

Polkadoodles - Dragon Onesie Little Dude

 Hello, lovelies!  It's Saturday, and you know what that means, right?!  We have a new Anything Goes Challenge up on the Polkadoodles Blog! 

This week the Design Team was asked to make a masculine card, and I immediately knew I wanted to create something using the Little Dudes Collection!  I am in love with these little guys, and I especially love that each of the digital stamps comes with coordinating patterned papers and sentiments as a bonus! 

I chose to work with the adorable Dragon Onesie Little Dude.  I just adore him!   I colored him up with Copic markers (colors listed below), cut him out, and set him aside to design my card. 

I used all three of the patterned papers that come with this digital stamp so that I could create a card with lots of layers.  I backed each of the layers with coordinating card stock and adhered all of the layers to my card base.  
I used one of the sentiment embellishments and cut it out.  I die-cut a stitched circle and a scalloped circle using the Circle Dies from C.C. Designs and layered them up.  These are my absolute most used dies.  Once I had my card front squared away, I popped my little dragon dude up on foam dots for some additional dimension 
I absolutely love this card and hope you do too! 
Colors Used:  
 Blue - B14, B12, B00, B000
Green - G07, YG25, YG11, YG00
Dots - BV29, BV25, BV23, NV20
Balloon - Y17, Y15, Y11
Skin - E51, E50, E13, E11, E00, E000
Lips - R83, R81
Hair - E18, E15, E21
Please make sure to pop over to the blog, check out the rest of the Design Team's inspiration and share your creations with us!!  There may just be a prize in it for you!  
As always, thank you so much for stopping by! 
Xoxo, Kim

Tuesday, July 27, 2021

AECP Level 2 Final Challenge - Part 1

 Hello friends!  I am so excited to FINALLY be posting my final challenge for Level 2 of the Altenew Educator Certification Program.  What does this mean?  I have now completed twenty courses for the Altenew Academy.  Level one consisted of ten courses and a final challenge, and level two included another ten courses and this final challenge.  

The requirements for the Level Two Challenge are as follows: 

  • Select any 3 components from the Level 1 or 2 courses
  • Explain the 3 components that you have chosen
  • Share design tips (if any)
  • Create 4 masculine cards with the following themes - Birthday, Love/Thinking of You, Anniversary, Encouragement
  • Create an altered or up-cycled item
  • Blog Post - Provide detailed step-by-step photo or YouTube tutorial, must have a minimum of 10 photos

Because this challenge was so involved, I am breaking this up into two posts (both long so please bear with me): one for the cards, and one for my altered/up-cycled item. 

I chose to focus on the following three courses:  Let it Shine, Celebration Stencil Techniques, and With a Twist.  I had a very difficult time choosing, because I enjoyed each and every course and have learned so many wonderful skills and techniques. 

For the components of Let it Shine, I incorporated heat embossing to add gloss or shine, and the use of metallic items (thread, washi tape, embossing) to take my cards to the next level. 

For the components of Celebration Stencil Techniques, I incorporated different embossing/ texture pastes to add dimension to my cards. 

For the components from With a Twist, I incorporated faux embossing using die-cuts and tone on tone stamping.  

Card One: 

 For my first card, I started with a panel of white card stock and I adhered my stencil down using some spray adhesive.  I mixed three shades of green ink to some Ranger Opaque Crackle Texture Paste and using a spatula, I spread a thin layer of the colored pastes over my stencil starting with the lightest color and moving to the darkest to produce a gradient effect.  Once I was satisfied with the layer of paste, I carefully peeled back the stencil and set the panel aside to dry.  This paste is a lot of fun because as it dries, it cracks and gives a unique texture to the background.  

I stamped the feathers in various shades of the Coffee Break family and I embossed the two smaller feathers using clear embossing powder to add another layer of dimension.  
To complete my card, I adhered my stenciled panel to a brown card base.  I embossed my sentiment on the same brown card stock and die-cut the sentiment strip into a flag.  Prior to adhering my elements, I looped some metallic gold thread around my fingers and placed it on the card stock with a glue dot.  I then attached my feather images and popped my sentiment strip up with foam tape. 

Tips:  

  • If you have time, allow the embossing paste to dry naturally.  Do not use a heat tool.  This way the panel will not warp as much. 
  • Using a heavier weight card stock with the embossing paste results in less warping. 
  • Use a super-strong adhesive to adhere the stenciled panel to your card base or the edges may lift. 
  • When embossing over an inked image, leave the stamp in your platform and line your card stock back up.  This will prevent having to line up your stamp again.
  • Don't be afraid to mix and match your stamp sets!  It will open up a whole new world of possibilities. 
 Products Used:

  • Recollections 110# Card Stock:  Brown
  • Neenah Crest 80# Card Stock:  Solar White
  • Altenew Feathery Stencil
  • Ranger Texture Paste:  Opaque Crackle
  • Altenew Crisp Dye Ink Re-Inkers:  Frayed Leaf, Forest Glade, Evergreen
  • Wow! Embossing Powder: Ultra Fine Detail Clear
  • Versamark Watermark Ink Pad
  • Altenew Golden Feather Stamps and Dies
  • Altenew Happy Dreams Stamps and Dies
  • Altenew Crisp Dye Ink:  Sand Dunes, Rocky Shores, Mocha, Espresso
  • Altenew Metallic Thread:  Enchanted Gold
  • Altenew Sentiment Strips 2 Stamp Set
  • Stampin' Up Embossing Powder:  Gold
  • The Greetery Slimline Dies
  • Foam Tape

Card Two:
For my second card, I focused on the faux embossing using die-cuts technique.  I love this technique, as it gives your card the dimension and texture of having been embossed, but it is achieved by adhering die-cut images to your panel. 
I began by stamping a variety of the leaf images on white card stock and die-cutting them.  Are these leaves not the most beautiful, ever?!  I was truly blown away by how incredible these stamps are.  
I began arranging my die-cuts on a panel of white card stock, making sure to vary the direction and have them hanging over the edges so that they appeared random.   Once I was happy with the placement, I began adhering them down to the card stock.  I then trimmed off the over-hanging edges with my scissors and used the small pieces to fill in any large white spaces.  
I adhered my panel to a black card base.  I embossed my sentiment on a strip of black card stock in white and trimmed the edge at an angle.  I tied a loopy bow from black metallic thread and attached it to the card front with a glue dot.  Lastly, I popped up my sentiment strip with foam tape. 
Products Used:
  • Recollections 110# Card Stock:  Black, White
  • Altenew Wild Ferns Stamps and Dies
  • Altenew Crisp Dye Ink:  Limeade, Lime, Fresh Leaf
  • Versamark Watermark Ink Pad
  • Wow!  Embossing Powder:  Opaque Bright White
  • Metallic Thread:  Black (purchased on Amazon)
  • Foam Tape
Card Three:
For my third card, I adhered the Alphabet Stencil to a panel of Neenah Solar White with spray adhesive and taped it down to my work surface with painter's tape to prevent it from moving around.  I blended Distress Oxide Inks from lightest to darkest. Allowing the colors to blend.  I set my panel aside to dry.  
I stamped three balloons using the same distress oxide inks.  Once they were dry, I stamped them again with embossing ink and heat embossed them using ultra thick clear embossing powder and then used the coordinating die to cut them out. 
As I was getting ready to put the elements of my card together, I decided that it needed something more.  I pulled out my Bubble Wrap stencil and spread a thin layer of transparent gloss texture paste.  I gently removed the stencil and set the panel aside to dry.   
While waiting for it to dry, I embossed my sentiment on a strip of black card stock in white. I adhered black metallic thread to the back of each balloon.  I adhered my embossed panel to a black card base and adhered the balloons to the front of the card, and finally popped my sentiment strip up with foam tape. 
Tips:
  • When using Distress Oxide Inks (or any inks really, but I found it especially true with the Oxides), be sure that your panel is completely dry before using a paste over it, otherwise the paste will pick up the tint of the ink.  
  • I need to keep some Fray-Check on hand.  The Metallic Threads tend to unravel a good bit.  To combat this, I used a fairly liberal amount of clear liquid glue on the ends and twisted them.  I also used that glue to adhere the ends to the card front.  Find creative ways to use the supplies you  have on hand! 
Products Used:
  • Recollections 110# Card Stock:  Black
  • Neenah Crest 80# Card Stock:  Solar White
  • Altenew Stencils:  The Alphabet, Bubble Wrap
  • Altenew Mini Delight:  Birthday Love Stamps and Dies
  • Distress Oxide Ink:  Squeezed Lemonade, Twisted Citron, Salty Ocean, Mermaid Lagoon
  • Ranger Texture Paste:  Transparent Gloss
  • Ranger Embossing Powder:  Ultra Thick Clear
  • Versamark Watermark Ink Pad
  • Wow!  Embossing Powder:  Opaque Bright White
  • Metallic Thread:  Black (Amazon)
  • Foam Tape
Card Four:
I have to say that this card was the most frustrating for me to make, but it is my absolute favorite.  For this card, I focused on tone-on-tone stamping, with metallic elements, which created a really striking card. 
I began with a panel of gray card stock and stamped the largest leaf image.  I am so thankful that I used my stamping platform, as I really struggled to get a clean stamped image, even after conditioning my stamps.  I stamped the same image multiple times using ink the same shade as my card stock, until I was happy with it.  I moved my leaf stamp and repeated this process, followed by filling in the spaces with the smaller image.  
Once I was happy with the coverage of my panel, I heat embossed the outline image in gold.  I was not careful with my placement, as I was hoping for an abstract look.  I trimmed my panel down and set it aside. 
I added a strip of narrow gold washi tape to a panel of hunter green card stock and attached it to a white card base.  I then adhered my embossed panel to the right side of the green panel. 
I embossed my sentiment on a strip of green in gold and cut a strip of gray card stock.  I trimmed both of them at an angle and glued them together.  Before adhering them to the card front, I looped some gold metallic thread loosely around my fingers and adhered it to the card.  I then attached my sentiment strips.  Did I mention that I really love this card? 
Tip:
  • Don't give up.  I almost did, and this card turned out to be amazing.  I just had to shift my perspective a bit. 
  • When embossing the outline image over the solid images, don't freak out if your image isn't perfect.  Pull out an embossing pen (I use a Versamark pen) to fill in the areas where the lines may not be complete, add some embossing powder, and heat it up.  No one will be able to tell.  
Products Used:
  • Recollections 110# Card Stock:  White
  • Stampin' Up Card Stock:  Gray Granite, Shades Spruce 
  • Altenew Leaf Canopy Stamp Set
  • Altenew Sentiment Strips Stsmp Set
  • Stampin' Up Ink:  Gray Granite
  • Versamark Watermark Ink Pad
  • Stampin' Up Embossing Powder:  Gold
  • Altenew Washi Tape:  Golden Edge
  • Altenew Metallic Thread:  Enchanted Gold
  • Versamark Pen
Thanks so much for hanging with me for this exceptionally long blog post!  I hope that something inspired you to try something new, or to dust off an old technique that you had forgotten about!  Happy stamping!