Showing posts with label 3-D Cards. Show all posts

Friday, March 3, 2023

Dreaming of Sand & Surf!

 Hi friends!  I am here to share a fun 3-D project that I created using the adorable Happy Beach Critters Stamps and Coordinating Dies from Prickley Pear Stamps.

This is a pop-up shadow-box card that stands on its own and has the cutest little scene inside, but it folds completely flat for mailing. 

I colored the cute little critters with Copic Markers and used the coordinating dies to cut them out.   I assembled the card.  I used some beach themed digital papers for the inside panel, which I tore to create the uneven shoreline.  I adhered the images to acetate and placed them strategically so that they would pop up and out at different heights and depths.
I created a banner for the sentiment which I embellished with a life preserver brad and then adhered it to the card front.  I also created a fun; ratty gingham bow that I embellished with a sunshine brad. 


I can't even tell you how much I love this little card!  I hope it inspires you to get crafty and try something new! 

You can find these little darlings in the shop here!

Thanks so much for spending a few minutes with me! 
Xoxo, Kim

**Affiliate links have been provided at no additional cost to you.  Thank you so much for supporting my hobby!**


Saturday, February 4, 2023

A Fun Pop-Up Shaker Card!

 Hi friends!  Today, I am sharing a fun 3-D card that I created using some amazing Kat Scrappiness products! 

My crafty friends, LV Handcrafted and StamprGrl and I get together regularly to have some LIVE crafty shenanigans and our last Mystery Craft Along was a total blast!  Linh (LV Handcrafted) led us in creating a mystery fun-fold card and this was the result - a Tuxedo Pop Up Box Card.  We had no idea what we would be making, but by following her clues, we made this super cool card! 

I decorated my card using the Heartfelt Wishes Slimline Paper Pad.  I created several heart shakers using the Love In Stitches Shaker Card Dies and I used the same dies to cut a few plain hearts.  I filled the shaker elements with 6mm Metallic Red Solid Heart Sequins and Sparkling Clear Diamond Jewel Mix. 

I am so glad that Linh showed us how to create this fun card!  I had never even heard of this fun-fold before! 
Please make sure to head over to the shop and check out these fun products that I used!  They are PERFECT for all of the Valentines that you will be making! 
Thanks so much for spending a few minutes of your day with me!  
Xoxo, Kim

**Affiliate links provided at no additional cost to you.  Thanks so much for supporting my hobby!**


Wednesday, January 4, 2023

Let It Snow!

Hi friends!  I am here with another super fun 3-D project that I created using several of the new Kat Scrappiness products! 

I really, really love the 3-D Pop Up Box Die, as it makes it so easy to create a beautiful, sculpted project that also folds flat to fit in an envelope. 

I die-cut all of the elements for the Pop-Up Box from blue card stock, assembled it and set it aside. I die-cut a whole ton of snowflakes using the new Snowflake Trio Dies.  The trio is three different sizes of snowflakes that you can layer or using them individually.  As you can see, I layered some, and left some by themselves. 
I used the Stitched Uppercase Alphabet Dies to die-cut the letters to spell "snow" and I adhered them to the front of the box.  I adhered the snowflakes to strips of acetate in graduated sizes and adhered the strips to the backs of the box layers.

To finish up my card, I embellished the heck out of the snowflakes using the Clear AB Glass Bubble Mix and added some snowflakes sequins from the Glistening Christmas Trees Sequin Mix and the Snowflake Parfait Sprinkle Mix.  Lastly, I added an iridescent white bow.
I hope you love this project as much as I do!  It really was a lot of fun to make.  Please make sure to head to the shop and check out all of the amazing products!
Thanks so much for spending a few minutes with me!  
Xoxo, Kim

**Affiliate links provided at no additional cost to you.  Thank you so much for supporting my hobby!**


Saturday, December 3, 2022

Winter Wedding Wishes

Happy Saturday, friends!  We have a new Anything Goes Challenge up over at Polkadoodles, and this week, the Design Team was asked to create a stepper card for a winter wedding. 

I used the pre-colored Bride & Groom digital stamp from the Work & Play 9 Collection.

I paired them with silver and shimmery white cardstock.  I dry-embossed the white panels using a folder from my stash.   I heat embossed the sentiment in silver. 
To complete my card, I added some clear sequins, a silver loopy bow, and some paper flowers. 
I really, really love this card.  I can't believe how beautifully it turned out! 
Please make sure to join us for the challenge and be entered to win some amazing prizes! 
Thanks so much for stopping by! 
Xoxo, Kim


Saturday, November 5, 2022

Happy Birthday, Gnomie!

Happy Saturday, friends!  You know what that means!  We have a new Anything Goes Challenge live on the Polkadoodles Crafting Blog!  This week the Design Team challenge was to create an easel birthday card using fall colors of browns and greens.  

I colored the adorable Autumn Wheelbarrow Halloween Gnome digital stamp with Copics (listed below), cut it out and set it aside.  
I started with a brown card base and layered several different cardstocks, including a digital paper (and I am sorry, but for the life of me, I can't remember which collection I pulled it from).  I inked the edges of all of the layers with Distress Ink. 
I wrapped a piece of burlap ribbon around the layers and before adhering it to the card base, I added a row of Stitched Flower Brads along the bottom.  I had to get a little bit creative with my main image, as the gnome is holding a jack-o-lantern on a stick.  Since Halloween is over, I covered it with a Sunflower Brad.  I also added some Stitched Flower Brads along the bottom of the panel. 

I stamped my sentiment on the inside of the card, and popped the "to you" panel up with foam tape so that the card front could rest behind it when popped open.  To complete my card, I created a loopy bow using some thin grosgrain ribbon paired with linen thread.  I cut the prongs off of a pumpkin brad and used my hot glue gun to make a "button" for the bow.  I also added some Chocolate Jewels from Kat Scrappiness to add some sparkle.
Colors Used:
Skin - E04, E11, E21, E00, E000
Beard - C9, C7, C5, C3, C1, C0
Green - G99, YG67, YG63, YG61
Brown - E29, E27, E25, E23, E21
Yellow - YR27, YR14, YR15
Blue - B29, B26, B24
Orange - E09, E99, E97
100
Misc. Shopping List:
I hope you are inspired to get out your craft supplies and try something new!  Make sure to share it with us on the Challenge Blog and be entered to win some amazing prizes!  
Thank you so much for spending a few minutes with me! 
Xoxo, Kim

Wednesday, October 19, 2022

Not a Turkey!

 Hi friends!  Have you had a chance to check out the Thanksgiving release from Kat Scrappiness yet?  I created a few cards for the release that I haven't shared with you yet, so I thought today was a good day for it. 

This card features some of my favorites from the release!  I used the new 3D Pop Up Box Die to create my card base along with the Grass Add-On Dies. I inked up the grass panels with Distress Ink to add a little bit of depth to them. 

I colored up several images from the Gobble Gobble stamp set with Copic Markers (listed below), die-cut them using the coordinating Gobble Gobble Dies and set them aside.  I die-cut the tree from the Crafters Essentials Fall Dies and I embossed my sentiment in gold and backed the panel with orange card stock.  To assemble the card, I determined where I wanted the elements to go and adhered them to the backs of the grass panels before I put the card together.   The best part is that this card folds flat to go in an envelope.
Colors Used: 
Burgundy - E49, R59, R29, R24
Orange - YR18, YR27, YR24
Gold - YR24, Y26, Y23, Y21
Teal - BG49, BG57, BG53, BG11
Brown - E29, E27, E25, E23, E21
Sign Frame - 100
Eyes - C1, C0, 0
Leaves - YG67, YG63, YG61
Acorn - E35, E34, E31
I literally cannot get enough of these cute turkeys!  I just love them!  I hope you have been inspired to get crafty!
Thanks so much for stopping by! 
Xoxo, Kim

Friday, September 30, 2022

Work Hard, Dream Big!

Hi crafty friends!   I know that we have already established that I hate housework.  Who's with me?   I do think that if I had the help of these adorable Chore Gnomes from Keep It Simple Paper Crafts, I might not mind so much.  OK, let's be real.... I would still hate it! 

I sure did love creating this adorable fun Double Z Fold Card using this fabulous collection! This was a mostly simple card to create, thanks to the die-cut embellishments and perfectly coordinated papers in the collection. 

I paired several of the patterned papers from the Chore Gnomes 6 x 6 Paper Pack with red, yellow, and navy cardstock.  I really enjoyed working with the primary colors - they are just so cheerful.  I inked up the edges of all of my panels using yellow distress ink before adhering them.
I used one of the gnomes and a few of the cleaning supplies from the Chore Gnome Die-Cut Pieces and stamped the Work Hard Dream Big sentiment from the Work Hard Stamp Set in navy blue. To complete my card, I added some enamel dots from the Back to Basics  - Royal Enamel Dots.
I really love this card!  I especially love that it stands on its own, but it folds flat for mailing!  
Please head over to the Keep It Simple shop and check out the collection! 
Thanks so much for stopping by! 
Xoxo, Kim

Friday, August 12, 2022

Coffee, anyone?

 Hi friends!  I hope that you are having an amazing week!  I am so thankful it is Friday. Phew!  Wasn't sure I was going to make it.... 

Today, I am sharing this super fun gift card holder that I created to showcase the sweet Brew It Anya stamp from The Greeting Farm!   I seriously had SO much fun creating it.

I colored Anya with Copic markers (colors listed below), cut her out and set her aside.   Ages ago, I purchased the Coffee Cup Gift Card Holder Honey Cuts from Honey Bee Stamps and I had never used it, so I thought it would be the perfect opportunity to give it a go. 

This die set was so incredibly easy to put together. I die-cut the holder using 80# white card stock.  I had tried with 110# and I found it was a bit too thick once the layers were added for it to close properly.  I die-cut the outer layers from Stampin' Up Butterfly Bijou DSP.  It coordinated with Anya's outfit so well! Using the die for the coffee sleeve, I cut it out of kraft card stock and I heat embossed the "enjoy" sentiment from the Celebrate and Enjoy stamp set.   I drew the stitching on the sleeve using a white gelly roll pen.  Once I had all of the elements ready, I adhered Anya to the sleeve so that she would hold the coffee cup lid flat. 
Colors Used: 
Skin - E04, E11, E21, E00, E000
Hair - E29, E08, E13
Clothing - BG15, BG13, BG11, BG10, C10, C8, C6, C4, C2, C0
Cup (Lid) - C2, C1, C0
I hope that you love her as much as I do!  I think this will make a fabulous gift!  
A HUGE thank you to The Greeting Farm for providing such wonderful images to work with!  If you have not been to their store, please go check them out!  
Xoxo, Kim

Thursday, August 11, 2022

Artful Angel July Release - Stand Tall

 Hey friends!  I have been dying to share this card that I created for the July Release over at Artful Angel!  I created a Twist Pop Up Card using the adorable Stand Tall and High There stamp sets. When I saw this stamp set, I knew exactly who I needed to make a card for, and I wanted to do something extra!  I found a tutorial on YouTube from Maymay Made It.  It was so incredibly fun and easy to make!  Ok, enough yammering... let's get to the details!  

I started by coloring up the cute giraffes in the stamp set with Copics (colors listed below), cutting them out and setting them aside to create the card.  
Seriously, this card is magical!  It makes me smile every time I look at this!  I decided to start with a base of kraft card stock and combined it with some olive green card stock and some super cute digital papers from Scrapbook Gem's In the Wild kit.  
For the front of the card, I needed some jungle leaves, so I used the Lawn Fawn Magic Iris Tropical Leaves Add-On and I added a stitched circle die-cut.  I distressed the edges of most of the panels using Vintage Photo Distress Oxide Ink.  I adhered the giraffe and added a jute bow to his neck. 
For the inside, I distressed the edges of the panels, stamped my sentiments and adhered the giraffes to the two end panels.  Funny story, after I had finished this card, I found out that there are dies that will do all the hard work for you.  ARE YOU KIDDING ME?  LOL... I did have a blast making this though!  Keep reading to see the GIF I created of this card in action. 
Colors Used: 
Body:  E44, E43, E42, E41, R20
Spots:  E37, E33
Mouth:  R83, R81
Eyeballs:  C1, C0
I hope you have enjoyed seeing this card!  I am beyond pleased with how it turned out!  
Thanks so much for stopping by! 
Xoxo, Kim


Saturday, June 18, 2022

Twiggy & Toots Graduation - Polkadoodles Crafting Challenge - Week 25

 Happy Saturday, friends!  You know what that means!  It's time for a new Anything Goes Challenge on the Polkadoodles Crafting Challenge Blog!   This week the Design Team was asked to make a card that isn't in the shape of a square or a rectangle.  WHAT!?! This was such a challenge for me.  

My nephew is graduating this year, so I wanted to make a really fun card for him.  I decided that my card would be in the shape of a graduation cap.  I found a fantastic tutorial for a Graduation Cap Easel Card on YouTube from Sam Calcott of Mixed Up Crafts.  
I colored the adorable Twiggy and Toots Graduation digital stamp with Copic markers (colors listed below), cut out the image and set it aside, so that I could create the card.   This was a fun 3D card to make, and the tutorial was so easy to follow. I love that the back has a large amount of white space to write a message on. 

Colors Used: 
Eyes - Y26, Y23, Y21
Brow - E43, E41, E40
Wings - E79, E74, E70
Cap/Gown/Shoes - C10, C08, C06, C04, C02, C0
Soles - E79, E74, E70
Diploma - Y26, Y23, E43, E41, E40
Bow/Tassle - B69, B66, B63
I know that my nephew will probably not appreciate this card as much as the rest of the family will, but that's OK!  He is a teenage boy, after all.  He will know that he is loved! 
I hope that you will join us for this week's Anything Goes Challenge!  There prizes up for grab!  Please head over to the blog and share your creations with us! 
Thanks so much for stopping by! 
Xoxo, Kim

Saturday, June 4, 2022

Little Dudes Pirate - Polkadoodles Crafting Challenge - Week 23

 Good morning, lovelies!  It's Saturday and that means we have a new Anything Goes Challenge up on the Polkadoodles blog! 

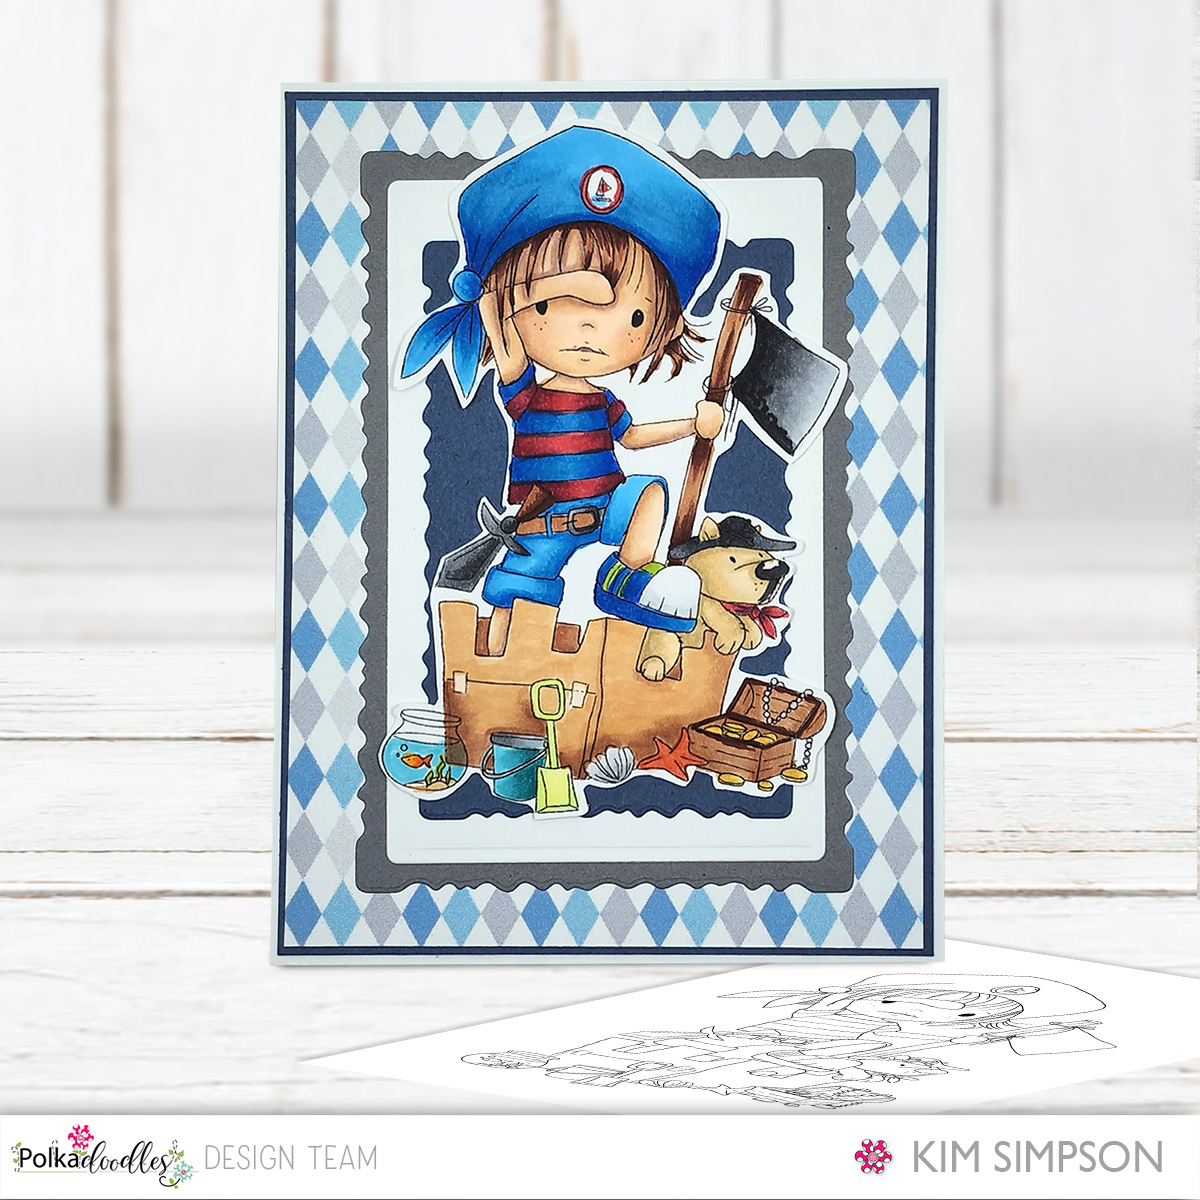
This week, we were challenged to create an easel card.  I wanted to try something different, and I found a Square Easel Fold Card tutorial by Gloria Plunkett, so I went to work creating!   I had so much fun coloring the Little Dudes Dragon Onesie, that I decided I wanted to make another card using this collection.  I colored up the Little Dudes Pirate with Copic markers (colors listed below), cut out the image and set it aside. 
I wanted to keep the color palette a bit subtle so that the image itself would stand out.  I used one of the digital papers that comes as a bonus with the digital stamp and then chose some solids that coordinated with the paper.  I used the Deckle Die Set from Stampendous to cut out the blue and gray panels.  

Lastly, I adhered one of the sentiments that is included with the stamp.  I just LOVE this little fella and the fact that the card folds flat and will fit in a standard envelope, and it stands on its own to display.  
Colors Used: 
Skin - E04, E13, E21, E00, E000, R20
Hair - E18, E15, E13
Denim - B16, B14, B12
Shirt/Dog Scarf - R59, R39, R35, B18, B16, B14, B12
Stick/Chest - E18, E15, E13
Coins - YR25, YR21, Y11
Sand Castle - E15, E13, E21
Pail - BG49, BG57, BG53
Fishbowl - YR07, YR04, YG25, ,E21, BG53
Shovel - YG11, YG00
Starfish - R05, R12
Shell - C01, C0, 0
Sword/Belt - E18, E15, E13, N9, N7, N5, N3
Dog - E55, E53, E51, N7
Please make sure to hop over to the blog and share your work with us!  There are prizes and bragging rights up for grabs, and because it is Anything Goes, that means that there are no product or theme requirements!  
As always, thank you so much for popping by! 

Xoxo, Kim


Tuesday, April 12, 2022

Artful Angel DT - Kraftin' Kimmie - Holiday Bears

 Hello lovelies!  I am here to share some projects that I made for Artful Angel this week.  I was so inspired by a blog post by Norine Borys about using mini stamps on cards.  I don't know about you, but I struggle with knowing how to use my small images, so they tend to sit unused in the package. 

I decided to challenge myself to use the little itty-bitty stamps in the Kraftin' Kimmie Holiday Bears stamp set and to use the Norine's layouts as sketches for my cards.  It opened up a whole new world for me.   I wanted to share with you just how easy it was to make these cards in case this is a struggle for you, too!  Keep scrolling for a super fun bonus card at the end using this same stamp set. (I might have gone a little crazy, once I got going with these little cuties!)   I created 3 cards, each with one image from the stamp set as the focal point.  They were all relatively quick and easy to make and I can't believe how cute they turned out! 
To start, I stamped all of the images and colored them with alcohol markers.  I used a combination of Stampin' Blends from Stampin' Up (because I wanted the colors to coordinate with my card stock, and my selection of blue Copics is a bit limited) and Copic markers.  The colors will be listed below.  
For the first card, I used the Stitched Indented Rectangle Dies from Elizabeth Craft Designs to die-cut the panel for my image.  I then stamped my image and sentiment and then colored the image.  I die-cut another panel using the next largest die in the set.  I adhered them to a panel from the Echo Park Winter Magic 6 x 6 Paper Pad.  To finish, I added a bow made from silver metallic thread. 
For the second card, I stamped my image in the lower corner of a 3 3/4" x 5" panel of white card stock and colored it.  I stamped the sentiment on the panel.  I embossed the snowflakes from the stamp set in a mostly random fashion, using WOW Vintage Peacock Embossing Powder.  To finish, I layered it on a panel from the Carta Bella Winter Market 6 x 6 Paper Pad. 
For all of these images, I used the same color palette, so I didn't have to come up with different color blends.  I really wanted to keep it super simple. 
For the third card (which just might be my favorite), I embossed the sentiment in white on a scrap of Navy card stock and trimmed it down.  I had an extra die-cut from my "bonus card" that I layered behind the sentiment tag as a snow drift in order to ground my image and not have the little cutie "floating".  I used a piece from the Carta Bella Winter Market 6 x 6 Paper Pack for my background and then layered up my elements.  
Oh, yeah!  I said I had a bonus card for you!  I recently purchased the new Lawn Fawn Platform Pop Up Dies and had so much fun making a birthday card for my hubby that I wanted to try again, and I thought that these little bears would be PERFECT to create a scene with!   The fun thing about this die set is that after it is assembled and decorated, it folds flat and fits in an A2 envelope. 
When I stamped my images for the cards, I also stamped all of the images from the stamp set, as I knew I wanted to use them all for the Pop Up!  I colored them using the same colors, and then cut them all out.  I heat embossed some of the sentiments on blue card stocks and set them all aside. 
I used two sheets of the snowflake paper from the Carta Bella Winter Market 6 x 6 Paper Pack to die-cut the Platform Pop Up base.  I die-cut the remaining pieces from card stock and I assembled the Pop-Up.  Lawn Fawn has an excellent video tutorial for assembling the card here. 
Once I had my card assembled, I started playing with the placement of the images until I was happy and then I adhered them in place with liquid glue and embellished the outside of the card.  I love how it turned out!  
Colors Used:
Bears:  N2, N1, N0, R30, R000
Bear Outfits:  Stampin' Blends (all Dark and Light) - Night of Navy, Misty Moonlight, Seaside Spray, Balmy Blue
Sled/Snowshoes:  E18, E15
Birds:  E51, E51, YR04
Snowballs:  BG11, BG10, C1, C0, 0
Spectrum Noir Sparkle Pen
This is all four of the cards together.  This was really a quick and easy effort and I now have 4 cards ready for winter!  I hope that you have found something that inspires you to get crafty and maybe try to tackle something that may have been a struggle for you!  
Thanks so much for hanging with me!  
Xoxo, Kim

Sunday, April 3, 2022

Kindred Stamps - Bananas - Birthday Card for my hubby!

 Hi friends!  How is your week going?  My husband recently celebrated another birthday, and I wanted to make him a special card.  My friend Kim (@canterburycarddesigns) and I joke about the expensive cards that we make for our husbands, and that is NO JOKE!  But, it is so worth it! 

For his card, I used the new Lawn Fawn Platform Pop Up Dies, along with the add-ons.  I couldn't believe how easy it was to put this card together!  I used some digital papers from ECraft Studios and I was finally able to use the Bananas Stamp Set from Kindred Stamps.  I literally bought this set just so I could use it on a card for him.  

I love how this pop-up card folds flat and fits in an envelope!  I colored the images using Copics (colors listed below), and I added Glossy accents to the minion eyeballs and the elder girls' glasses to add some interest. 
Copics Used: 

Minions: Y17, Y15, Y13, Y11

Denim: B26, B24, B23, B21

Skin:  E04, E11, E21, E00, E000, E0000, R20

Black Hair: C8, C6, C4

Striped Shirt: E04, Y17

Suit/Scarf:  C8, C6, C4, C2, C0

Blonde Hair:  Y32, E53

Pink Outfit:  R85, R83, R81, RV13, RV21

Brown Hair:  E18, E15, E13

Skirt:  V09, V17, V15, V12

Jacket:  E55, E53

Glasses/Eyes:  C8, C6, C1, C0, E13

My husband loved his card (and so do I)!  He even shared it on Facebook!  #daymade!

Thanks so much for stopping by!  

Xoxo, Kim