Showing posts with label Kat Scrappiness. Show all posts

Saturday, February 25, 2023

Love for the Bride & Groom!

 Hi friends!  Kat Scrappiness has an amazing new mini-release today and we are celebrating with an Instagram Hop! 

I created this beautiful wedding card using the new Bride and Groom Dies.
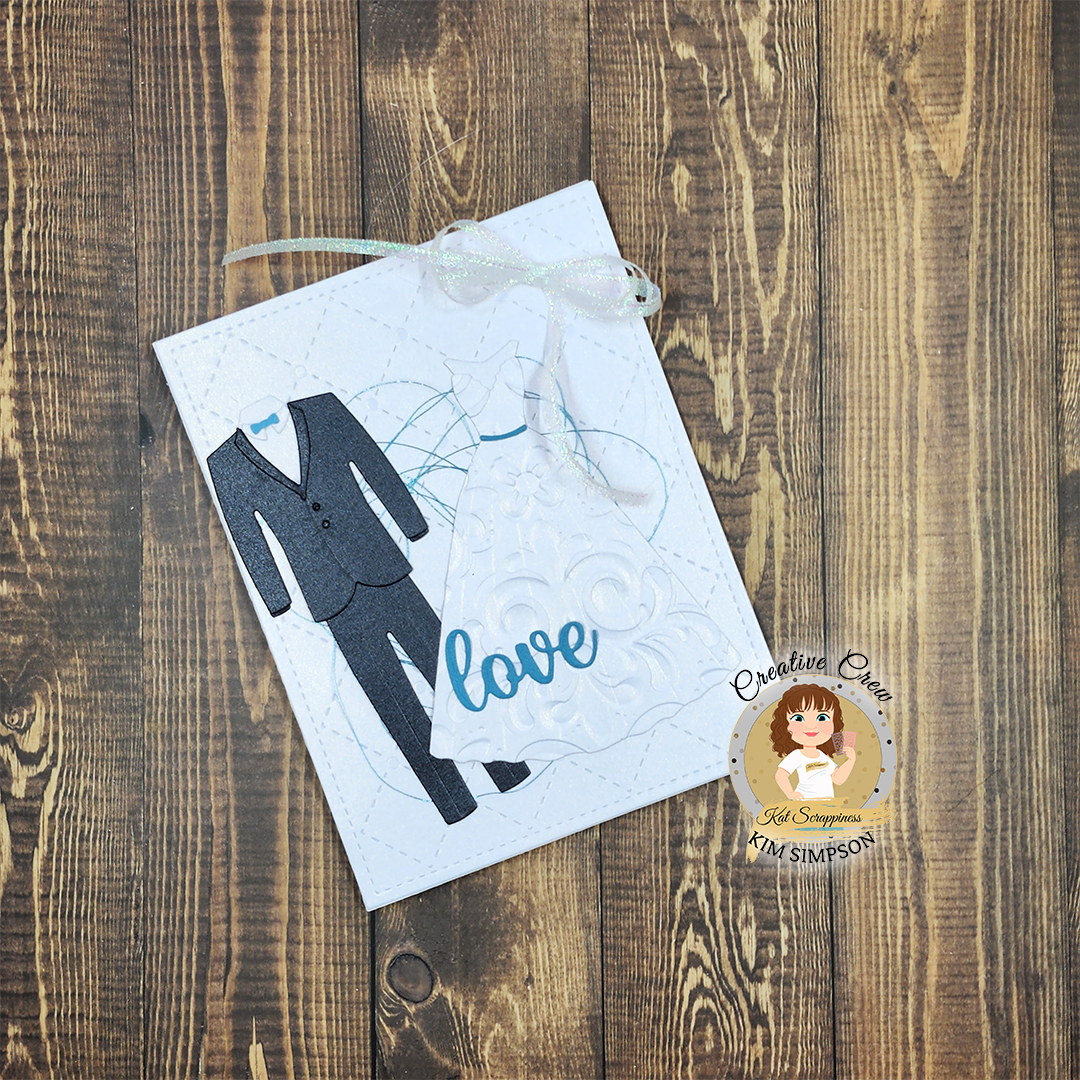
I die-cut all of the pieces for the groom's tuxedo from shimmery card stocks and set them aside. I die-cut the wedding dress from shimmery card stock and ran it through an embossing folder from my stash and also set them aside.
I used the A2 Quilted Backdrop Die and die-cut a panel from the same shimmery white card stock that I used on the dress and adhered it to the card front.  
I added a nest of teal metallic embroidery thread to the card front and I assembled the tuxedo and dress, adhering them to the card.  I used the Love You Word w/ Shadow Die to die-cut "Love" from the teal shimmery card stock and added it to the front.  Lastly, I added a bow of iridescent white ribbon.

Make sure to join us on Instagram and hop along with us for a chance to win a gift certificate to the shop

Thanks so much for spending a few minutes of your busy day with me! 

Xoxo, Kim

**Affiliate links have been provided at no additional cost to you.  Thank you so much for supporting my hobby!**

Thursday, February 23, 2023

Rainbow Hugs

Hi friend!  Today is my day to share a project that I created for Kat Scrappiness.  I don't know about you, but I am ready for winter to be over, so I wanted to create a spring card.  I think I am trying to convince myself that the groundhog was wrong and it's right around the corner. 

I used the Confetti Party Rainbow Dies to die-cut the rainbow elements from watercolor paper.  I water colored them using my Zig Clean Color Brush Markers and set them aside to dry.

I used the A2 Quilted Backdrop Die to create the cover panel of my card and adhered the rainbow to the front.  I die-cut the sentiment from watercolor paper using the Rainbow Hugs Word w/Shadow Dies and also water colored the sentiment before adhering it to the card front.  Lastly, I added a loopy bow and some Sparkling Clear Diamond Jewel Mix to the front.

I hope you love this card as much as I do!  Make sure to head to the shop and check out all of these goodies! 

Thanks so much for spending a few minutes of your day with me!  
Xoxo, Kim

**Affiliate links provided at no additinoal cost to you.  Thank you for supporting my hobby!**


Tuesday, February 7, 2023

I Love You Berry Much!

Hello friends!  Today, I am sharing a berry sweet card that I created for a "Galentine's" Card Swap and Instagram Hop using some of the amazing newly released products from Kat Scrappiness

I started by coloring the strawberries from the Berry Sweet Stamp Set with Copic markers and I used the coordinating Berry Sweet Craft Dies to cut them out.  I die-cut the chocolate portion using the same die set, and I swiped the die-cut pieces over a dark brown ink pad until they were colored in really well.  Once the ink was completely dry, I swiped them across a Versamark ink pad and I heat embossed them with clear embossing powder several times, which gave them a beautifully raised glossy surface.  I then adhered them to the berries.
To create the card, I started with a white card base, and I layered one of the patterned papers from the Berry Sweet 6 x 6 Paper Pad onto a panel of pink, and then adhered them to the card base.  I used the Stitched Scalloped Border Dies to die-cut a piece of deep red card stock and then I heat embossed the sentiment from the Berry Sweet Stamp Set on it.  I wrapped that layer with iridescent white embroidery floss and adhered it to the card front, followed with a loopy bow.  Lastly, I added some Clear AB Glass Bubbles to the front of the card. 
I hope that my swap partner really loves this card. It was berry fun to create! 
I hope you will join us on Instagram for the Crafty Fun w/Friends of LV Handcrafted Hop!  There will be tons of inspiration for your last minute Valentine's cards! 
Thanks so much for stopping by! 
Xoxo, Kim

**Affiliate links have been provided at no additional cost to you.  Thanks so much for supporting my hobby!**


Saturday, February 4, 2023

A Fun Pop-Up Shaker Card!

 Hi friends!  Today, I am sharing a fun 3-D card that I created using some amazing Kat Scrappiness products! 

My crafty friends, LV Handcrafted and StamprGrl and I get together regularly to have some LIVE crafty shenanigans and our last Mystery Craft Along was a total blast!  Linh (LV Handcrafted) led us in creating a mystery fun-fold card and this was the result - a Tuxedo Pop Up Box Card.  We had no idea what we would be making, but by following her clues, we made this super cool card! 

I decorated my card using the Heartfelt Wishes Slimline Paper Pad.  I created several heart shakers using the Love In Stitches Shaker Card Dies and I used the same dies to cut a few plain hearts.  I filled the shaker elements with 6mm Metallic Red Solid Heart Sequins and Sparkling Clear Diamond Jewel Mix

I am so glad that Linh showed us how to create this fun card!  I had never even heard of this fun-fold before! 
Please make sure to head over to the shop and check out these fun products that I used!  They are PERFECT for all of the Valentines that you will be making! 
Thanks so much for spending a few minutes of your day with me!  
Xoxo, Kim

**Affiliate links provided at no additional cost to you.  Thanks so much for supporting my hobby!**


Wednesday, February 1, 2023

You'd Butter Be Mine!

Hello, friends!  I am still trying to wrap my head around the fact that January is done and dusted!  I swear that as I get older, time speeds up. 

Today, I am sharing another card that I made using products from the Be My Valentine 2 Release from Kat Scrappiness.  I absolutely love this card!

When I saw the Butter Me Up Craft Dies and Butter Me Up Sentiment Stamps, I knew this card needed to come together!  It really was a ton of fun to create. 
I die-cut the toast from a kraft and ivory card stocks, and then I added some Distress Oxide ink to the edges to add some dimension.  I die-cut the pat of butter and also inked up its edges before assembling the toast.
I used the Stitched Scalloped Border Dies to die-cut a panel from one of the papers in the Be My Valentine 6 x 6 Paper Pad along with a piece of red card stock, and I layered them over a piece of suede card stock, before adhering them to the card base. 

I heat embossed the sentiment on a red banner and adhered it to the back of the piece of toast and then added it to the front of the card.  I added a bow made from hemp twine and finished the card with some Chocolate Jewels.
I hope that you love this card, too!  Make sure to check out this latest release in the shop!  You will not be disappointed! 

Thanks so much for spending a few minutes of your day with me! 

Xoxo, Kim

**Affiliate links provided at no additional cost to you.  Thank you so much for supporting my hobby!**

Thursday, January 26, 2023

Do You Believe in Love at First Sight?

Hi friends!  I am back to share another card that I made for the new Kat Scrappiness Be My Valentine 2 Release!  This release is seriously chockers full of amazing products perfect for creating your Valentine's cards! 

I die-cut the A2 Postcard Die from dark red card stock and set it aside.   I stamped several of the images from the Be My Valentine 6 x 8 Stamp Set, colored them with Copic markers, and die-cut them using the coordinating Be My Valentine Dies
I heat embossed several of the sentiments from the Be My Valentine Stamp Set and I adhered the focal image, which I wrapped with some iridescent embroidery floss to the large square and added a bow to it, and then I adhered the stamp in the upper right corner.  I added some sparkle to the Be Mine image and when it was dry, I popped it up in on a foam dot.
Lastly, I stamped the squiggly lines over the stamp, and I added some Clear AB Glass Bubbles.  The glass bubbles are seriously my favorite embellishment!  They just look amazing on anything, and they come in a huge variety of colors.
I hope you love this card as much as I do!   Make sure to check out all the new goodies in the shop!  You will NOT be disappointed! 
Thanks so much for hanging out with me for a few minutes!  Have a great day!
Xoxo,  Kim

**Affiliate links included at no additional cost to you.  Thank you so much for supporting my hobby!**


Monday, January 23, 2023

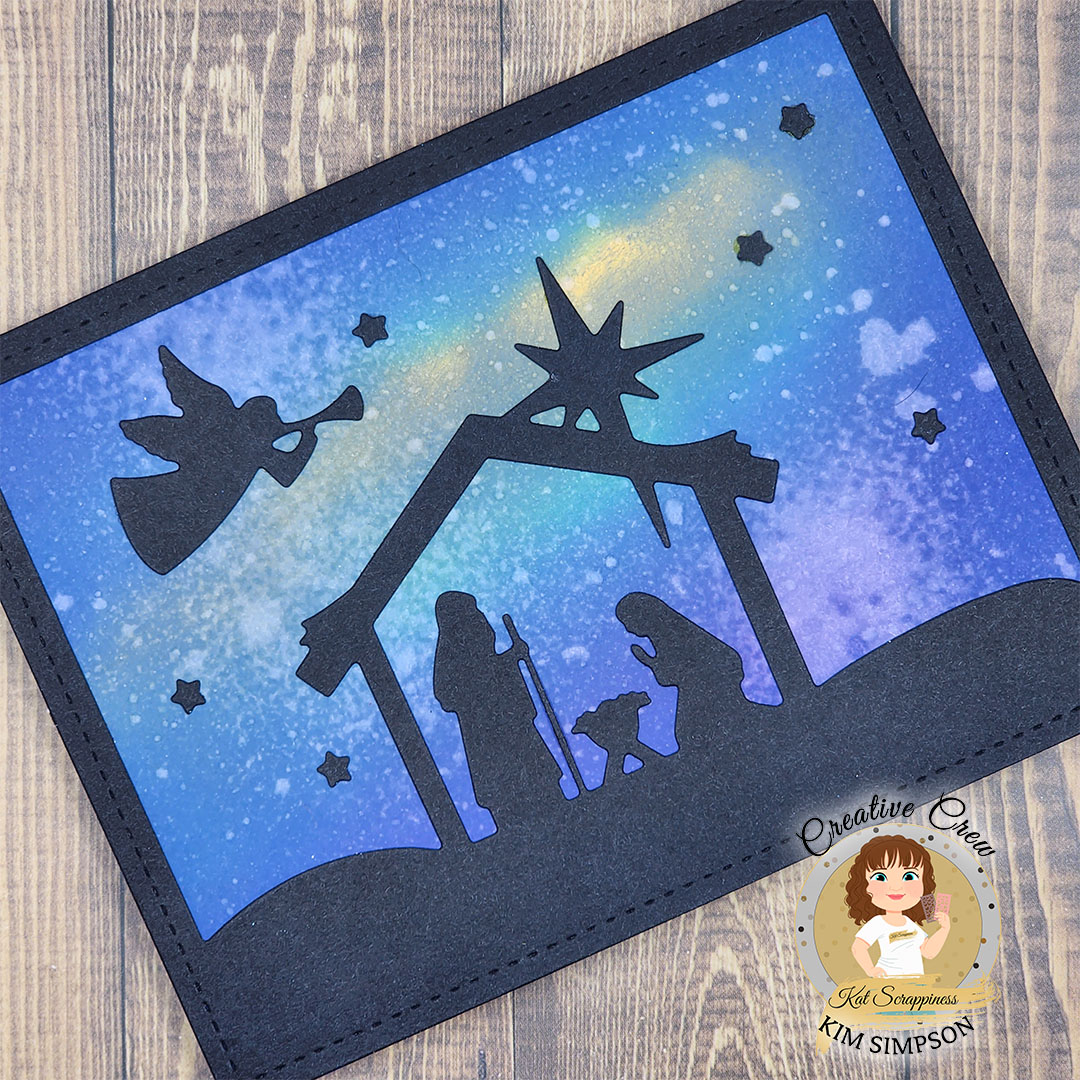
Silent Night!

 Hi friends!  Today is my day to share a Kat Scrappiness project.  I am trying to challenge myself to make at least one Christmas card each month this year, as I didn't get any cards sent out in 2022 (sorry!).  I still have several items from the amazing Kat Scrappiness Holiday Release that I didn't get the opportunity to use, so I figured why not! 

The Nativity Scene Die is so beautiful on its own, I wanted to keep the card relatively simple.  To create my card, I did some ink blending to create a beautiful night sky using Distress Oxide inks, and some splattered water. 

I die-cut the nativity scene in black card stock and adhered the ink-blended panel behind it.  I then adhered the angel and the stars to the ink blended panel.  I did not add a sentiment, as I was really afraid it would take away from the beautiful scene.

I know this card is simple, but I just love it!  I hope you love it to!  Make sure to head to the shop and check out this beautiful die set.  Remember, it is NEVER too early to start creating your holiday cards! 

Thanks so much for stopping by! 

Xoxo, Kim

**Affiliate links provided at no additional cost to you.  Thank you so much for supporting my hobby!**


Saturday, January 21, 2023

Be Mine, Valentine!

 Hello crafty friends!  I am so excited to be sharing this amazing card that I made with some of the brand-new products from the second Kat Scrappiness Valentine's Day Release!  I cannot even tell you how much goodness is in this release.  You will just have to join us over on Instagram for the Be My Valentine IG Hop!  If you hop along with us, there is a $25 prize up for grabs. 

To create this card, I stamped these juicy berries from the Berry Sweet Stamp Set, colored them with Copic Markers, and used the coordinating dies to cut them out.  I also stamped the Be Mine image from the Be My Valentine Stamp Set, colored it, and cut it out with the coordinating dies

I die-cut a white panel using the A2 Heart Sunburst Die.  This is one of my favorite cover dies, and while I covered up the heart with the berries, it still adds a beautiful layer of dimension!
I layered one of the beautiful patterns from the Be My Valentine 6 x 6 Paper Pad behind the die-cut cover panel and adhered them to my card base.  I created a large loopy bow from some really old ribbon and iridescent embroidery thread from my stash.  I attached it to the center of my card with a glue dot and then popped the berries up on foam dots.  Lastly, I added the little sentiment with foam dots. 

I really, really love this card!  I am so happy with how it came together.  Please make sure to check out all of the amazing goodies from this release in the shop!  You will not be disappointed!

Don't forget to head over to Instagram and hop along with us!  The Creative Crew has really knocked it out of the park with the inspiration that they have created for you! 
Thanks so much for stopping by!
Xoxo,  Kim

**Affiliate links have been provided at no additional cost to you.  Thank you so much for supporting my hobby!**


Saturday, January 7, 2023

Hello friends!  I hope your New Year is off to a smashing start!  Today, the Kat Scrappiness Design Team is celebrating the new release with a super fun Instagram Hop!  

I had the best time ever creating this fun Valentine's Day card using the brand new Pop the Bubbly Dies.  I die-cut the bottle from olive card stock and added some ink to add some dimension to the bottle.  The label is made from vellum and the foil from gold card stock. I also die-cut the glasses from vellum and used a greenish gold foil for the champagne. 
I used the Stitched Hearts Coverplate Die to create a red panel, which I layered on gold cardstock and a base of shimmery black.  I adhered the bottle and glasses and added a loopy gold bow to the neck of the bottle.  I die-cut my sentiment in gold and black using the Love You Word with Shadow Die and popped it up with foam dots.  Lastly I added some Charcoal Black Rhinestones to the card front.
I absolutely love this card!  I hope that you will join us for the Instagram Hop and be entered for a chance to win a $25 Voucher to the shop

Thanks so much for hanging out with me for a few minutes! 
Xoxo, Kim

**Affiliate Links provided at no additional cost to you.  Thanks so much for supporting my hobby!**


Wednesday, January 4, 2023

Let It Snow!

Hi friends!  I am here with another super fun 3-D project that I created using several of the new Kat Scrappiness products! 

I really, really love the 3-D Pop Up Box Die, as it makes it so easy to create a beautiful, sculpted project that also folds flat to fit in an envelope. 

I die-cut all of the elements for the Pop-Up Box from blue card stock, assembled it and set it aside. I die-cut a whole ton of snowflakes using the new Snowflake Trio Dies.  The trio is three different sizes of snowflakes that you can layer or using them individually.  As you can see, I layered some, and left some by themselves. 
I used the Stitched Uppercase Alphabet Dies to die-cut the letters to spell "snow" and I adhered them to the front of the box.  I adhered the snowflakes to strips of acetate in graduated sizes and adhered the strips to the backs of the box layers.

To finish up my card, I embellished the heck out of the snowflakes using the Clear AB Glass Bubble Mix and added some snowflakes sequins from the Glistening Christmas Trees Sequin Mix and the Snowflake Parfait Sprinkle Mix.  Lastly, I added an iridescent white bow.
I hope you love this project as much as I do!  It really was a lot of fun to make.  Please make sure to head to the shop and check out all of the amazing products!
Thanks so much for spending a few minutes with me!  
Xoxo, Kim

**Affiliate links provided at no additional cost to you.  Thank you so much for supporting my hobby!**


Sunday, December 25, 2022

Holly Jolly Christmas!

Merry Christmas, friends!  I hope that you are in the midst of holiday revelry and sharing time with your friends and family!  I am catching up on some holiday posts, and I can't believe that I forgot to share this fun infinity shaker card!  

I colored up several of the images from the Santa & Friends stamp set from the Scandinavian Christmas Collection from Keep It Simple Papercrafts with Copic Markers and I added Fun Flock to Santa's fluffy spots.  I also added some accents with a white Posca Paint Pen and a gold gelly roll pen.  I used the coordinating dies to cut the images out and set them aside. 

To create the inside panel of the shaker, I die-cut a whole lot of red and green strips using the Stitched Slimline Strips Dies from Kat Scrappiness.  I adhered them on the diagonal to a piece of card stock cut slightly smaller than my shaker window and trimmed them all the way around. 
To create the shaker itself, I used the new Mini Slimline Full Front Shaker Card Pocket from Kat Scrappiness.  It is as easy as placing your panel inside the pocket and adhering three sides to the back of the panel (adhesive is already applied to the pocket), leaving one open.  I filled the pocket with some fun shaker elements, also from Kat Scrappiness and sealed up the fourth side.  
Once I had my shaker sealed up, I adhered it to the card base and added my elements to the front.  Easy peasy! 
Merry Christmas to you all!  Thanks so much for spending a few minutes of your day with me! 
Xoxo, Kim

**Affiliate links provided at no additional cost to you.  Thank you for supporting my habit!**


Wednesday, December 14, 2022

Silent Night!

Hi friends!  I am up on the Kat Scrappiness Blog today, and I am so excited to share a card I made using some of the amazing products from the latest release!   I am a huge fan of the beauty in nature, and I feel that this card represents that so well! 

Here is how I made this card!

  1. I die-cut a panel for my card front using the Birch Tree w/Cardinal Backdrop Die
  2. I added a shimmery white embossing paste to the die-cut panel, and I love the effect that it gave.  I then set it aside to dry completely.
  3. When the panel was dry, I adhered it to a white card base.
  4. I die-cut the cardinals from a deep red cardstock and adhered them to the branches.  
  5. I die-cut one of the deer from the Reindeer Duo Dies from dark brown card stock and adhered it to the front of the card.
  6. I used a sentiment from the Simple Sentiments Stamp & Die Bundle and backed it on holographic cardstock.
  7. I tied a loopy bow from iridescent embroidery floss and added it behind the sentiment panel and then popped the panel up on foam dots.
  8. Lastly, I pulled out some of the snowflake sequins from the Glistening Christmas Tree Sequin Mix and added them to the card front.
Make sure to head over to the shop to check out the full release!  You will not be disappointed!   Don't forget that all Christmas products are 10% off through December 24th with code CHRISTMAS10

I hope that you love this card as much as I do!  It was so incredibly much fun to create, and was really quite easy, as the dies did all of the hard work!

Thanks so much for spending a few minutes of your day with me!  

Xoxo, Kim

**Affiliate links provided at no additional cost to you.  Thank you for supporting my hobby!**


Sunday, December 4, 2022

Not Just a Card!

Hi friends!  I am over on the Kat Scrappiness Blog today, and I am sharing a project that is not a card!  I wanted to show how versatile the amazing dies are!  First, I would love to know if you create handmade gifts or not.

Rather than creating a card, I used the Mason Jar Shaker Card Dies to create an ornament.   I had seen an advertisement for a wood shaker ornament somewhere, and I immediately thought that I could recreate it using these dies.


 Here are the instructions for creating the ornament:
  1.  Die-cut the mason jar outline from heavy cardstock several times.  I used heavy kraft cardstock and I cut 6 outlines.
  2.  Die-cut the solid portion of the mason jar twice from acetate.
  3.  Adhere acetate to the top of one outline die-cut, the bottom of one outline die-cut and set them aside to dry completely if using a liquid adhesive.
  4.  Using the remaining die-cut pieces, adhere them together and adhere to the bottom die-cut that has acetate adhered to the top.   This will create your shaker base.  Allow to dry completely if using liquid adhesive.
  5.  Once the layers are dry, add your shaker bits.  I used the Holiday Bliss Mix for my ornament.
  6.  Adhere the top of the shaker (acetate is adhered to the bottom of the die-cut layer) to the base and allow to dry.
  7.  Die-cut the "fabric" piece from your favorite patterned paper and the jar band from your favorite metallic paper.  I used the Gobble Gobble 6 x 6 Paper Pad.
  8.  Prior to adhering the "fabric" and band, wrap a piece of jute around the top of the mason jar and tie it to create a hanger.
  9.  I added two banners and hand wrote the year on one of them, adhered them down and then added the "fabric" piece and jar band.
  10.   Add a simple bow and any other desired embellishments.

Shopping List:

Mason Jar Shaker Card Dies

Holiday Bliss Mix

Gobble Gobble 6 x 6 Paper Pad

I hope that you are inspired to find new ways of using your products!  I had so much fun creating this ornament, and I am amazed at how simple it really was!

Thanks so much for hanging out with me!

 Xoxo, Kim

**Affiliate links have been provided at no additional cost to you.  Thanks so much for supporting my hobby!**


Wednesday, November 30, 2022

'Twas the Night Before Christmas

Hello friends!  Today, I am sharing the last card that I made for the Kat Scrappiness Holiday Release.  I think this might be my favorite!  

I literally had the best time creating this card with all sorts of mediums!  To start, created a night sky using Distress Oxide Inks.  I also created the snowflake background using a stencil and white ink.  

I die-cut the window pane using the Night Before Christmas Window Scene Dies from the Lumber Yard 6 x 6 Paper Pad to create a woodgrain window frame.  I used the same die to die-cut the night sky panel so that I could paper piece it into the background spaces.  (That was teriffying!)
I die-cut the tree from green cardstock and added the snow using my almost dried up shimmer white texture paste.  The good thing about it being on its last leg is that it has a chunky effect, so it looks more realistic.  I die-cut the star out of gold cardstock, the snowflakes from shimmery white cardstock, and the silhouette of Santa and his sleigh from black card stock and adhered them all in place.
Once all of my elements were adhered to the card front, I finished the card off with a loopy bow.
I don't know about you, but this card just makes me want to re-read Twas the Night Before Christmas!  I am ready for Santa to visit (well, not really... not even a little bit ready!!), are you?
Thanks so much for stopping by!  
Xoxo, Kim

**Affiliate links have been provided at no additional cost to you.  Thank you for supporting my habit... I mean hobby!**


Monday, November 28, 2022

A Poinsettia For You!

Happy Monday!  I am not ready for the long weekend to be over.  Today, I am sharing another card that I made for the Kat Scrappiness Holiday Release.  
I was so excited to use the new Layered Poinsettia Dies.  I love 3-D Flowers and these dies made it so simple!  I started by die-cutting the flower pieces from pink card stock.  I wanted my poinsettia to shimmer, so I pulled out my Splatter Box and used some gold metallic spray.  I never know when to stop, so rather than leaving it spotted, I covered the entirety of the petals with gold.  You really can't tell in the photo, but the flower is rose gold in color.  I did the same with the green leaves but left green showing through.  
I used ink to do a watercolor wash on a piece of white card stock, and added some more gold splatters.  Once it was dry, I die-cut the panel using the A2 Quilted Backdrop Die and adhered the panel to my card base.
I die-cut the Noel sentiment using the Noel Word w/Shadow Dies and made a loopy bow from gold metallic thread.  I adhered the poinsettia to the card front and then added the bow, followed by the sentiment.  To complete the card, I added a handful of rhinestones from the Gold Mine Rhinestone Mix
I really love these layering dies!  It made creating a beautiful flower so incredibly easy!
Thanks so much for visiting today! 
Xoxo, Kim

**Affiliate links have been provided at no additional cost to you.  Thank you so much for supporting my habit.... I mean hobby!**