Showing posts with label Happy Birthday. Show all posts

Friday, February 10, 2023

HBD!

 Happy Friday, crafty friends!  I am still working on building my stash of birthday cards, and it is so fun and easy to do using brads, as there are endless possibilities!  

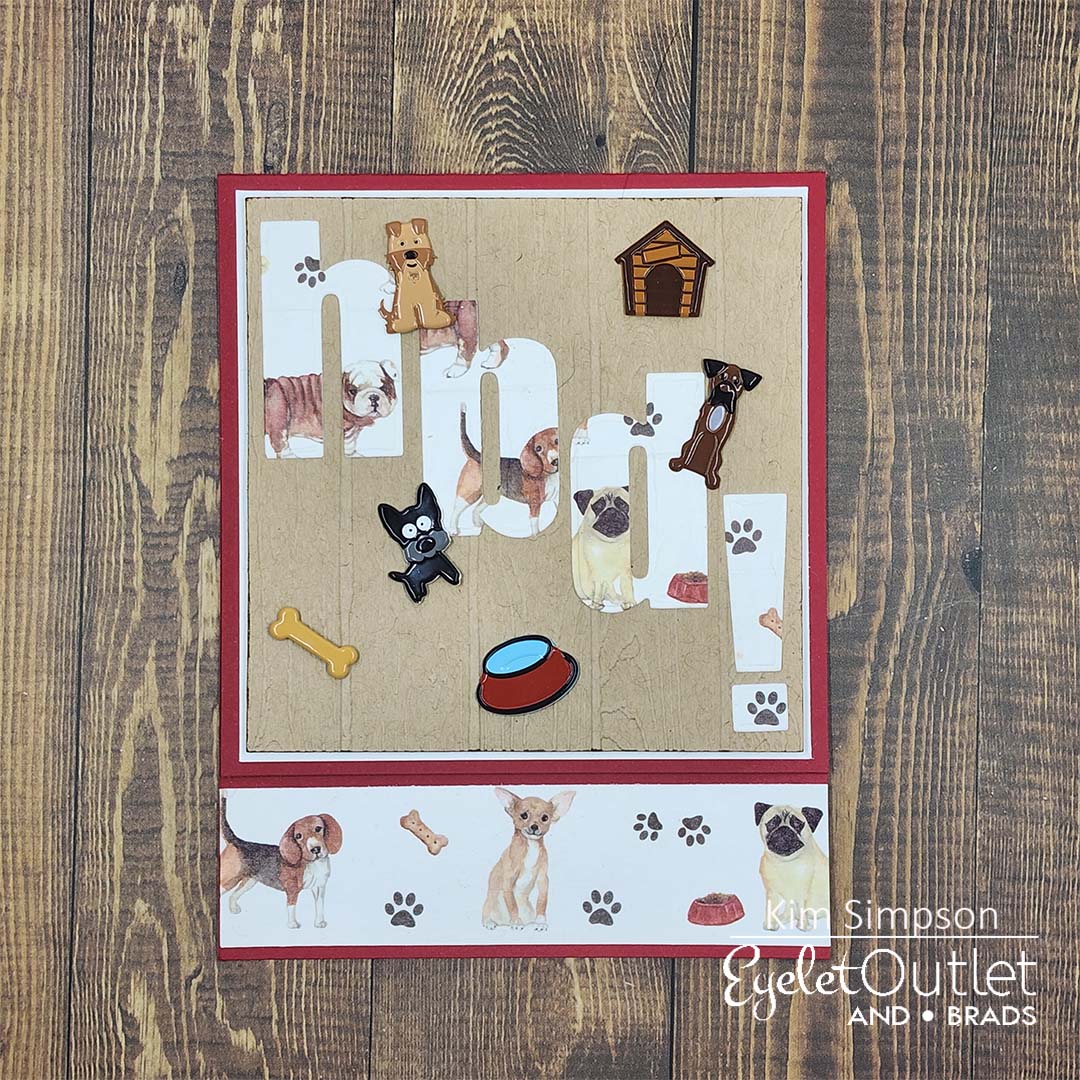
I have so many dog lovers in my life, so I made a card for one of them.  I started by wrapping a strip of white card stock with Dog Washi Tape.  I trimmed the front of my card base down and adhered the washi panel to the inside of the card base.  This allows the dogs to show on the front of the card when it is closed, and on the inside panel.

I wrapped another panel of white card stock with the washi tape and I die-cut the letters "h, b, d, and !" from that panel.  I adhered the HBD diagonally to a wood-grain kraft panel.   I embellished the panel with several of the Puppy Brads and Kennel Mix Brads before adhering to the card front.

I hope you are inspired to create something today!  This card was really a lot of fun to make! 

Shopping List: 

Thank you so much for hanging out with me! 

Xoxo, Kim

Friday, February 3, 2023

For My Favorite Handyman!

 Happy Friday, friends!  Are masculine cards a struggle for you?  They sure are for me, and I never seem to have enough birthday cards for the guys in my life!  I created a super fun birthday card for my favorite handyman.  

I started by creating a background panel by alternating the Tool Washi Tape with strips of card stock that I die-cut.  I created my focal point by adding a large die-cut birthday sentiment to a piece of craft cardstock.  

Before adhering the panels to the card base, I added screw dies to each corner of the washi panel, and I used some toolbox and tool dies on the sentiment panel.  I then popped them up on the card base with foam dots.
Shopping List: 

Thank you so much for hanging out with me! 

Xoxo, Kim

Tuesday, January 31, 2023

Happy Birthday for Turner Syndrome Foundation Card Auction

Hi friends!  Today, I am sharing a fun birthday card that I created to donate to an Auction for the Turner Syndrome Foundation. Turner Syndrome is a genetic disorder where a female is born without the second X-chromosome, leaving her with lifelong medical issues.  You can read more about Turner Syndrome here

I colored up the adorable gnome image from Polkadoodles with Copic markers and cut it out.  I chose some coordinating digital papers from the shop and inked up the edges before layering them on my card base.  I created a cute little tag and added it to the card front.  I heat embossed the sentiment and created a little banner, which I adhered to the back of the gnome before adding him to the card front.  Lastly, I added some clear glass bubbles. 


I hope that you will join us for the auction over on Instagram!  The auction photos will go live on February 1 and it will close on February 28.  
If you love my card, please head over and bid on it! (I have also donated a second card, but you will have to find it!  I promise it is worth the hunt!)  This is such a worthy cause and all of the proceeds will go to The Turner Syndrome Foundation.  I am so honored to be able to participate!  
Thanks so much for stopping by!  
Xoxo, Kim


Monday, January 30, 2023

Have a Roarsome Birthday!

Hello friends!  I am  here to share a super fun birthday card that I created using the darling Dinosaur Pals stamps and dies from Prickley Pear Stamps & Dies.  I never seem to have enough birthday cards, and so I have been working to build up my stash.  I love that this stamp set is perfect for anyone! 

I started by coloring this little cutie and the greenery with Copic markers and using the coordinating dies to die-cut them. 

I kept my color palette very simple with greens and whites, and I love how the color really pops off of the front of the card.  I paired the dinosaur with some dies in my stash from Whimsy Stamps and an embossing folder from Altenew.  I wanted to add a lot of texture and dimension, and I think it came together perfectly!

I seriously love this card!  The Dinosaur Pals stamp set is full of cute dinosaurs and some great elements to build a scene.  Stay tuned, as I will be sharing another card that I made soon. 

Make sure to head over to the shop and check it out!  

Thanks so much for spending a few minutes with me!  I hope you have a great day! 

Xoxo, Kim

**Affiliate links provided at no additional expense to you.  Thank you so much for supporting my hobby!** 

Friday, January 27, 2023

A Unicorn Birthday Wish!

  Hello, crafty friends!  I never seem to have enough birthday cards in my stash, so I thought today would be a great day to build up some of my stash!  

I am really trying to work on some clean and simple cards, because they really allow the embellishments to shine. 

I started by wrapping the edges of a card stock panel with Glitter Blue Green Washi Tape and adhered it to a pink card base.  I dry embossed the main card panel with a balloon embossing folder from my stash.  I die-cut the sentiment in teal card stock and adhered it to the embossed panel before setting some of the darling Unicorn Brads in place. I adhered the panel to the card front and added the Rainbow Brad to my bow with my hot glue gun. 

This was such a fun card to create!  I hope you are inspired to pull out your favorite embellishments and get to work!

Shopping List: 

Thank you so much for hanging out with me! 

Xoxo, Kim

Friday, January 6, 2023

Happy Birthday to Moo!

 Hi crafty friends!  I hope that you have recovered from the holidays and life is settling down for you.  

I had the best time creating this barnyard birthday card for Eyelet Outlet!   I started by creating the adorable barn using the Lawn Fawn Build-A-Barn Dies.  I added a chicken to the window, and a goat and cow to either side of the doors.  

I wanted to add a little bit of sparkle, so I used the Glitter Black Washi tape to add a border to my sentiment strips.  Lastly, I added a bow from baker's twine.
Shopping List: 

Thank you so much for hanging out with me! 

Xoxo, Kim


Wednesday, December 28, 2022

Happy Birthday, Southwestern Style!

 Hello, friends!  Over at Prickley Pear Rubber Stamps, we are so excited to be sharing the newest release with you - The Southwest Collection!

I had so much fun creating with this collection, that I made two cards to share with you today!  I love anything animals, so I really love the Southwestern Fun Stamp Set!   It is perfect for masculine cards, though it really works for any occasion!  

  Masculine cards are a huge struggle for me, and I never have birthday cards on hand for the guys, so this was a perfect opportunity to add to my stash.  I paired this stamp set with some fabulous digital paper that I found on Etsy.
Once I figured out what I was doing, these cards came together so quickly!  I heat embossed the animals on die-cut circles and set them aside.  I also heat embossed sentiments from the Kokopelli - Happy Birthday Stamp Set and cut the strip into a banner.  I wrapped my card panels with some champagne colored metallic embroidery thread and added a loopy bow. 
Please make sure to head over to the shop and check out the entire release!  You won't be disappointed!  Also make sure to head to the Prickley Pear Pals Facebook Group and keep an eye out!  The amazing Design Team will be sharing their inspiration with you all week.
Thanks so much for spending a few minutes with me!  
Xoxo, Kim

**Affiliate links provided at no additional cost to you.  Thanks so much for supporting my hobby!**

Thursday, September 15, 2022

Bless Your Heart!

Howdy partner!  I am here to share another fun card from the Little Cowgirl Birthday Collection from Keep It Simple Paper Crafts.  This might seriously be my new favorite collection!  

I made a fun fold card that was inspired by @stampin_heidi.  She calls it the Vertical Double Fold card.  When I saw it, I knew it was perfect to show off these amazing, patterned papers! 

This card came together pretty quickly because I used one of the die-cut embellishments as my focal image.  Folded flat, the card is a standard A2 size (4 1/4" x 5 1/2"), but when opened, it is 4 1/4" x 11".

The card opens up into 3 sections, and the last section is suitable for writing a message on. 
I used the Stitched Indented Squares dies from Elizabeth Craft and inked those panels up with So Saffron ink.  I popped the die-cut embellishment up on foam squares, added a loopy bow and some enamel dots. 
Shopping List: 
You really need this adorable collection!  It is just so versatile!  Please come join us in the Keep It Simple Paper Crafts Group on Facebook!  Check out all of the amazing inspiration that the Design Team has created!  Let me tell you, it is something else!  
Thanks so much for stopping by! 
Xoxo, Kim

Tuesday, September 6, 2022

Yee-Haw! Let's Eat Cake!

 Hello, friends!  I am so excited to share my first project as part of the AMAZING Design Team for Keep It Simple Paper Crafts!  

The adorable Little Cowgirl Birthday collection is the latest release, and I cannot tell you just how fabulous it is!  It has EVERYTHING you could possibly need to make any little (or big) cowgirl's dreams come true! 
I created a fun easel card using several of the products in the collection.  I stamped several of the images and colored them with Copic markers (colors listed below).  I die-cut them using the coordinating dies and set them aside. 
I created my card base from heavyweight kraft card stock.  I die-cut the lacy, scalloped square using my Cricut, and paired it with a few of the adorable, printed papers that are part of the collection.  I distressed the edges of all of the layers using Walnut Stain Distress Ink. 
I stamped two of the sentiments from the coordinating sentiment stamp set - one for the front, and one for the inside - and trimmed them to size, and then layered them on pink card stock.  For the inside of the card, I adhered the flowers and then popped the sentiment up using foam dots, which creates a stopper to hold the easel up when the card is opened.
To complete the card, I colored some white seam binding using my So Saffron Stampin' Blend Marker to coordinate with the card stock.  I adhered all of my panels to the base.  I popped the main image up on foam squares, added a loopy bow and the coordinating enamel dots.  
Colors Used: 
Pink - R32, R30, R000
Orange - YR18, YR27, YR24
Green - G07, YG25, YG11, YG00
Yellow - YR24, YR23, YR21
Purple - BV17, BV11, BV00
Brown - E29, E27, E25, E23
Skin - E04, E11, E21, E00, E000, R20
Hair - E99, YR24, YR23
Shopping List: 

I hope that you love this card as much as I do!  Please head over to Keep It Simple Paper Crafts and check out all of the beautiful products that they carry, especially the fabulous Little Cowgirl Birthday collection!  We would love it if you would join us in the Keep It Simple Facebook Group!  
Thanks so much for stopping by!  
Xoxo, Kim

Sunday, July 24, 2022

Coming Soon - Artful Angel - High There

 Hello, lovely crafty friends!  I am so excited to share the reveal of my project for the upcoming Artful Angel release!  For this card, I used the adorable High There stamp set. 

This stamp set is full of amazing sentiments to coordinate with another upcoming release - Stand Tall, which I also used in this card. To create my card, I started by coloring the darling giraffe using Copic markers (colors listed below), cut it out and set it aside. 
I had this fabulous cobblestone stencil from the Kindred Stamps Prehistoric Family Box in my stash and when I looked at it, I saw a giraffe pattern, so I used it to create my background.  I used Vintage Photo and Antique Linen Distress Inks with the stencil, and I was so happy with how it turned out.  
I die-cut a circle and added some Antique Linen Distress Ink to the edges to soften them.  I heat embossed the Tall Rumor sentiment on the front of the panel and I adhered it to the card base and I heat embossed the rest of the sentiment on the inside of the card base.  I added my die-cut circle and trimmed off the overlapping edge.  To finish up, I added a jute bow and popped the giraffe up on foam dots. 
Colors Used:
Body - E44, E43, E42, E41, R20
Spots - E37, E33
Mouth - R83, R81
Eyes - C1, C0
I hope you are as excited as I am to see the rest of this amazing release!  Please make sure to head over to the Artful Angel Takes Flight Facebook Group to see all of the amazing inspiration from the Design Team and then head over to the Artful Angel Shop on the 25th and shop, shop, shop!   Make sure to use discount code "KIMSIMPSON" at checkout to save 10% off of your order!
Thanks so much for stopping by!  
Xoxo, Kim

**Affiliate Links provided at no additional cost to you.**

Saturday, May 28, 2022

PPC&F - Your Next Stamp - Balloon Bouquet

 Can you believe it?  Two posts in one day!  I had so much fun shopping at Your Next Stamp, that I had to create some more cards to celebrate our fabulous sponsor at Passionate Paper Creations & Friends!  I created a pair of birthday cards using the Balloon Bouquet stamps and dies. 

I colored up the balloon bouquet image in two different color schemes - they both could really be unisex; however, I felt that one is more masculine, and one is more feminine.  

It took me a while to get banner images that I was happy with.  I used some REALLY OLD Stampin' Up markers to color the banner and stamp it.  I have never been more thankful for my Misti, as I did this one color at a time.  (I tried it all at once, but I just couldn't' get a clean image that I was satisfied with.)  I then stamped the Happy in black ink and die-cut all of the images with the coordinating dies.


I dry embossed the balloons on a white card panel.  I have had the embossing folder for quite a while and had never used it, but can I say that I just love it?!  I then arranged my stamped images (I had to ask my hubby for his opinion on the placement) and adhered them to the panel, and then attached it to a white card base. 


I am so, so happy with how these cards turned out!  I can tell you that I never have enough birthday cards, so I am glad to add these to my stash! 

Products Used: 

Your Next Stamp Balloon Bouquet Stamp Set

Your Next Stamp Balloon Bouquet Dies

Altenew Bunch of Balloons 3D Embossing Folder

Copics:

Red - R59, R39, R35

Orange - YR07, YR04, YR02, YR00

Yellow - Y17, Y15, Y13

Green - YG07, YG25, YG11, YG00

Blue - B18, B16, B14, B12

Pink - RV09, RV06, RV04, RV02

Teal - BG49, BG57, BG53

Violet - V17, V15, V12

If you missed it earlier, be sure to head over to Passionate Paper Creations and Friends to check out the surprise that Your Next Stamp has offered for our members!  

Thanks so much for stopping by!  Happy Crafting! 

Xoxo, Kim

Sunday, May 22, 2022

Artful Angel May Release - Big Happy Hugs

Hello crafty friends! Today, I am over on the Artful Angel blog and wanted to share with you here, also!  I hope you are having an amazing weekend!  I am SO excited to get to be a part of the project reveals for Artful Angel’s May Release!  I created this bold, cheerful birthday card using Big Happy Hugs which will be available in the Artful Angel shop on May 25th! 

This card was so much fun to make!  I started with a 5 ½” x 4 ¼” panel of white card stock.   Using a ruler, I (very lightly) marked the center point of the panel (2 ¾” on the long side and 2 1/8” on the short side).  I then placed my card stock in my Misti (or whatever stamp positioning tool you use) and I centered the largest “Happy” stamp over the center at an angle.  I then drew a faint pencil line above and below the stamp to create a guide.  I repeated this until I had the entire panel marked up.  (I don’t trust myself to just eyeball the placement 😊

I determined which order my colors would go in and proceeded to stamp my images.  I placed the “happy” stamp over the center point again and I inked it up using teal ink (colors listed below).  Again, I used my Misti for this process, so that if I didn’t get a clean image on the first try, I could re-ink and stamp again.  I cleaned the stamp before I moved on to the next placement.  I repeated it across the remainder of the line ensuring to run the image off the side of the card panel.   I skipped two rows and then repeated this process with the teal ink above and below the center row.   I repeated this process over and over with the remaining two colors until my card panel was filled in completely.
I placed a piece of black card stock in my Misti and I placed the “Happy” stamp down and picked it up with the cover.  I prepared my card stock using my Embossing Magic  tool to remove any static.  I inked up my stamp with Versamark Ink and heat embossed the sentiment in white.  I then repeated this process with the “Birthday” stamp, making sure to use the Embossing Magic tool again to eliminate any static before embossing.  I let the panel sit for a moment to ensure the embossing was dry (I have made the mistake of touching it after I had embossed – not only did I burn my finger on the molten lava that is the embossing, but I ruined the image, so I won’t make that mistake again) and then I die-cut it with the C.C. Designs Rectangle Dies.  I love these because they have a simple stitched border to them. 
I trimmed a piece of black card stock to 5 3/8” x 4 1/8” and trimmed the colorful panel to 5 ¼” x 4” and then I adhered it to the black panel.  I attached these panels to my card base using liquid adhesive.  Lastly, I popped my sentiment panel up using foam squares.
Colors Used: 

Stampin' Up Ink - Melon Mambo, Bermuda Bay, Gorgeous Grape

 I hope that you are as excited as we are about this latest new release!  It will be available in the shop on May 25th.  Make sure to use discount code KIMSIMPSON at checkout to save 10%.  Stay tuned for more amazing inspiration from the Design Team over the next few days!  If you haven't already, make sure to join us this week in the Artful Angel Takes Flight Facebook Group for the ongoing festivities!  Thanks so much for stopping by! 

Xoxo, Kim


**Affiliate links provided at no additional cost to you.**

Sunday, April 3, 2022

Kindred Stamps - Bananas - Birthday Card for my hubby!

 Hi friends!  How is your week going?  My husband recently celebrated another birthday, and I wanted to make him a special card.  My friend Kim (@canterburycarddesigns) and I joke about the expensive cards that we make for our husbands, and that is NO JOKE!  But, it is so worth it! 

For his card, I used the new Lawn Fawn Platform Pop Up Dies, along with the add-ons.  I couldn't believe how easy it was to put this card together!  I used some digital papers from ECraft Studios and I was finally able to use the Bananas Stamp Set from Kindred Stamps.  I literally bought this set just so I could use it on a card for him.  

I love how this pop-up card folds flat and fits in an envelope!  I colored the images using Copics (colors listed below), and I added Glossy accents to the minion eyeballs and the elder girls' glasses to add some interest. 
Copics Used: 

Minions: Y17, Y15, Y13, Y11

Denim: B26, B24, B23, B21

Skin:  E04, E11, E21, E00, E000, E0000, R20

Black Hair: C8, C6, C4

Striped Shirt: E04, Y17

Suit/Scarf:  C8, C6, C4, C2, C0

Blonde Hair:  Y32, E53

Pink Outfit:  R85, R83, R81, RV13, RV21

Brown Hair:  E18, E15, E13

Skirt:  V09, V17, V15, V12

Jacket:  E55, E53

Glasses/Eyes:  C8, C6, C1, C0, E13

My husband loved his card (and so do I)!  He even shared it on Facebook!  #daymade!

Thanks so much for stopping by!  

Xoxo, Kim


Friday, February 25, 2022

Horace & Boo Surprise - Polkadoodles Craft Challenge Week 9

 Happy Friday, crafty friends!  You know what that means...  There is a new Anything Goes Challenge up on the Polkadoodles blog!

This week, the Design Team was asked to create a birthday card.  I never seem to have enough birthday cards on hand, so I was excited to jump on in!  This was the perfect opportunity to add to my stash.   Make sure to stop by the blog to see all of the inspiration that the Design Team has created for you. 


I LOVE the Horace and Boo collection, so I thought I would color up the adorable Surprise digi stamp with my Copic markers.  This collection is FULL of embellishments and papers, so I took advantage of them and I layered up one of the digital papers with some bright cardstock.  I also cut out the circles using my Scan 'n Cut.  I used a few of the embellishments and one of the sentiments from the collection to complete my card. 

Don't forget that there are several prizes up for grabs, so please make sure that you stop by the blog and share your creations with us!  
Thanks so much for stopping by! 

Thursday, March 25, 2021

Altenew Academy - Creative Coloring with Erum: Day 4

 Happy Thursday!  I am so excited to share my latest card made for the Day 4 lesson if Creative Coloring with Erum. 

In this class, we focused on ink blending and the watercolor drip method.   I have always been in awe of Erum's watercolor backgrounds, so this class was perfect for me! 
I began by stamping my images and then because I didn't have coloring stencils for this stamp set, I actually used the masking stencils to add color to the images using my ink-blending tool.  I then fussy cut the images, as I did not have dies. 
To create my background, I added a watercolor wash to the top of my panel of watercolor paper.  I then allowed (in a controlled manner) the ink to drip down the bottom of my panel.  I then added some ink splatters using the darkest pink shade.  When my panel was dry, I added some gold ink splatters using the Altenew Metallic Watercolors and followed up with a black fine tipped pen to add some more "splatters". 
I adhered my floral images using foam tape and added some loops of gold thread behind my sentiment before attaching it. 
Lessons Learned:
I need to work on controlling my water, as that is a struggle for me.
Using ink blending to color my images was a very quick and easy technique to get beautiful results
Adding the gold splatters made all the difference to the background.  It was a bit bland, but when I added the splatters, it really popped. 
Products Used:
  • Recollections 110# White Card Stock
  • Arches 140# Cold Pressed Watercolor Paper
  • Altenew Darling Rose Stamp Set
  • Altenew Label Love Stamp Set
  • Altenew Crisp Dye Ink: Fresh Lemon, Pinkalicious, Rubelite
  • Altenew Permanent Black Ink
  • Altenew Metallic Watercolor Pan:  Enchanted Gold
  • Altenew Metallic Thread:  Enchanted Gold
  • Foam Tape
  • Mini Ink- Blending Tool
Thanks so much for stopping by!  Please leave me a comment and let me know what you think! 
Happy stamping!