Showing posts with label Artful Angel Stamps. Show all posts

Friday, July 1, 2022

Artful Angel July Sketch Challenge

 Good morning, lovelies!  I am so excited to be hosting the July Sketch Challenge for Artful Angel

The sketch for this month is from @cardmaps and it is a ton of fun to work with, as it combines a bunch of elements - layers, banners, string wrapping, and stitching!  
I created a 5" x 7" card, because I wanted to make sure that I had plenty of room for all of the elements, without the card feeling crowded.  I colored up the adorable Savannah image from the brand new Adventure Awaits stamp set with Copics (colors listed below), cut her out and set her aside.
To make Savannah's background a bit more realistic, I added a sun to the corner, and I did some very light ink blending to the background to create a sky, rather than having Savannah on a plain white background.
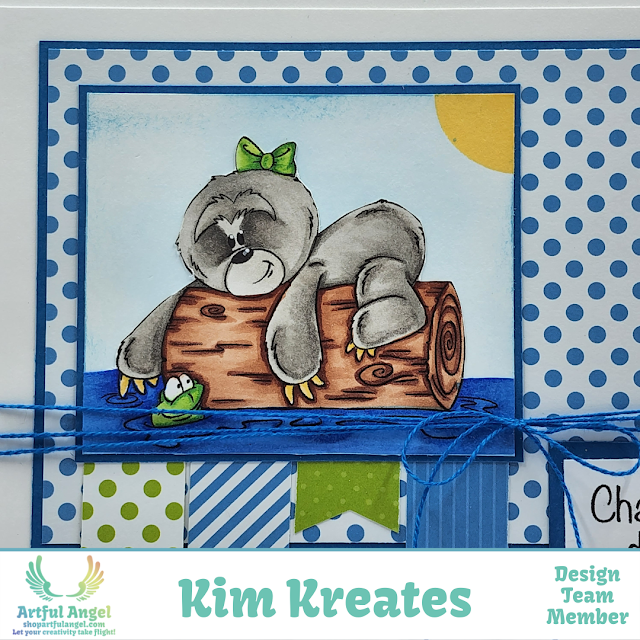
I used a Photo Play 6 x 6 paper pad that I have in my stash for the polka dot background and for all of the banners.  I added an extra panel of white to allow me to hide my string wrapping, rather than having the backside of the wrapping showing on the inside of my card.  I used some cotton crochet thread that I found on Amazon and I love it for this very purpose.   You will also notice that I did not include the stitching.  Because my image has the water that covers the lower portion of the panel, I didn't feel that the stitching would add anything, and in fact, it might be a distraction. 
Colors Used:
Savannah - W9, W7, W5, W3, W1
Claws - E13, Y26
Bow/Frog - G07, YG25, YG11, YG00
Water - B29, B26, B24
I can't wait to see what you create with this sketch!  Please make sure to upload it in the July Sketch Challenge album in the Artful Angel Takes Flight Facebook Group to be entered to win a $10 voucher to the Artful Angel store, along with a badge for your blog, and bragging rights! 
Thanks so much for stopping by!  
Xoxo, Kim

Tuesday, May 24, 2022

Artful Angel May Release - Day 2 - S'more Wishes starring Savannah the Sloth

 Hello again, lovelies!! I wanted to share my project reveal for Day 2 of the May Release!  Today, I created a card that spotlights our favorite Savannah the Sloth.  

For this card, I wanted to keep an outdoorsy, camping, theme, and I figured what better way to do that than to incorporate some red plaid (think Lumberjack), wood frame, and a beautiful starlight night!  I colored Savannah at the campfire and the lantern using Copic markers (colors listed below), cut her out and set her aside.

To create my ink-blended starry background, I began with a 4 ¼’ x 5 ½’ panel of Distress Watercolor paper.  Using a foam blending tool, I blended the first layer using Chipped Sapphire Distress Oxide Ink.  When I was satisfied with the coverage, I blended a wavy stripe of Wilted Violet Distress Oxide through the center of the panel.  I then added Fossilized Amber Distress Oxide to the upper right corner of the panel and Faded Jeans Distress Oxide across the bottom.   I finished by adding an additional layer of Chipped Sapphire along the outer edges.  I spritzed water over the card stock and let it set for a few minutes and then laid a towel over the panel and placed pressure on it to pick up the excess water.  Finally, I spritzed the panel with Iridescent Shimmer Ink Spray and Silver Metallic Ink Spray.  I set the panel aside to dry completely.

While that was drying, I die-cut a wood frame using the Hero Arts Wood Frames Dies and ink-blended with Vintage Photo Distress Oxide Ink.   I also die-cut some grass panels from watercolor paper using the C.C. Designs Cloud and Grass Dies and I water colored them using Altenew Crisp Dye Inks in Lime, Limeade and Fresh Leaf.

I adhered a panel of plaid paper from the Echo Park Let’s Lumberjack 6 x 6 Paper Pad to a black card base.  I then set to work creating my scene.  I trimmed my grass and starry panels to fit in the frame and attached them, grass first, using liquid adhesive.  I then adhered the frame to the card base and added Savannah and the lantern.

To finish off my card, I embossed the sentiment on black card stock in white and die-cut it using the C.C. Designs Scalloped Rectangle Dies.  I popped the sentiment panel up using foam dots.

Colors Used:

Distress Oxide Inks – Vintage Photo, Chipped Sapphire, Faded Jeans, Wilted Violet, Fossilized Amber

Copic Markers:

Grass – G07, YG25, YG11, YG00

Bow – R59, R39, R35

Savannah/Rocks – W7, W5, W3, W1, W0

Log – E18, E15, E13

Fire – R08, R5, YR04, YR17, Y08

Lantern – R59, R39, R35, Y17, Y15, W9, Y02, Y00

You will be able to grab Savannah and all of the other amazing new goodies from the shop tomorrow!  Make sure to use discount code KIMSIMPSON at checkout to save 10%!   Make sure to join us over in the Artful Angel Takes Flight Facebook Group for more inspiration from the Design Team and lots of fun activities!   Thanks so much for stopping by! 

Xoxo, Kim

**Affiliate links have been provided at no cost to you**


Sunday, May 22, 2022

Artful Angel May Release - Big Happy Hugs

Hello crafty friends! Today, I am over on the Artful Angel blog and wanted to share with you here, also!  I hope you are having an amazing weekend!  I am SO excited to get to be a part of the project reveals for Artful Angel’s May Release!  I created this bold, cheerful birthday card using Big Happy Hugs which will be available in the Artful Angel shop on May 25th! 

This card was so much fun to make!  I started with a 5 ½” x 4 ¼” panel of white card stock.   Using a ruler, I (very lightly) marked the center point of the panel (2 ¾” on the long side and 2 1/8” on the short side).  I then placed my card stock in my Misti (or whatever stamp positioning tool you use) and I centered the largest “Happy” stamp over the center at an angle.  I then drew a faint pencil line above and below the stamp to create a guide.  I repeated this until I had the entire panel marked up.  (I don’t trust myself to just eyeball the placement 😊

I determined which order my colors would go in and proceeded to stamp my images.  I placed the “happy” stamp over the center point again and I inked it up using teal ink (colors listed below).  Again, I used my Misti for this process, so that if I didn’t get a clean image on the first try, I could re-ink and stamp again.  I cleaned the stamp before I moved on to the next placement.  I repeated it across the remainder of the line ensuring to run the image off the side of the card panel.   I skipped two rows and then repeated this process with the teal ink above and below the center row.   I repeated this process over and over with the remaining two colors until my card panel was filled in completely.
I placed a piece of black card stock in my Misti and I placed the “Happy” stamp down and picked it up with the cover.  I prepared my card stock using my Embossing Magic  tool to remove any static.  I inked up my stamp with Versamark Ink and heat embossed the sentiment in white.  I then repeated this process with the “Birthday” stamp, making sure to use the Embossing Magic tool again to eliminate any static before embossing.  I let the panel sit for a moment to ensure the embossing was dry (I have made the mistake of touching it after I had embossed – not only did I burn my finger on the molten lava that is the embossing, but I ruined the image, so I won’t make that mistake again) and then I die-cut it with the C.C. Designs Rectangle Dies.  I love these because they have a simple stitched border to them. 
I trimmed a piece of black card stock to 5 3/8” x 4 1/8” and trimmed the colorful panel to 5 ¼” x 4” and then I adhered it to the black panel.  I attached these panels to my card base using liquid adhesive.  Lastly, I popped my sentiment panel up using foam squares.
Colors Used: 

Stampin' Up Ink - Melon Mambo, Bermuda Bay, Gorgeous Grape

 I hope that you are as excited as we are about this latest new release!  It will be available in the shop on May 25th.  Make sure to use discount code KIMSIMPSON at checkout to save 10%.  Stay tuned for more amazing inspiration from the Design Team over the next few days!  If you haven't already, make sure to join us this week in the Artful Angel Takes Flight Facebook Group for the ongoing festivities!  Thanks so much for stopping by! 

Xoxo, Kim


**Affiliate links provided at no additional cost to you.**

Monday, April 25, 2022

Artful Angel Launches New Stamp Line! - Popping By

 Hello lovelies!  I can't even begin to tell you how excited I am to share this project with you today!  Artful Angel is launching their own stamp line today and I am so honored to be able to participate and introduce you to Savannah the Sloth!   Popping By is the first Artful Angel stamp set to be released, but there will be more Savannah to come soon!  

For my card, I colored Savannah with Copic markers (colors listed below) and cut her out.  I adhered a panel of Stampin' Up's Pattern Play DSP to a panel of white card stock.  Using the Circle Dies from C.C. Designs, I die-cut a circle from the panel. I popped this panel up on my card base using foam squares, and I placed a navy circle inside. I then adhered Savannah so that she appears to be popping out of the circle. 
I heat embossed my sentiment in white and die-cut it using Stampin' Up's Tasteful Labels Dies.  I also die-cut  a scalloped circle and several hearts with the die that comes in the Circle Dies set and adhered them to the card-front.  I then attached Savannah so that she appears to be popping out of the circle. 
Colors Used:
Grass:  G07, YG25, YG11, YG00
Savannah:  W7, W5, W3, N2, N0, R20
Flowers: Y17, Y15, Y11, Stampin' Up Misty Moonlight Dark/Light
I don't know about you, but I can't wait to see what other shenanigans Savannah gets up to in the future! 
Make sure to come over to the Artful Angel Takes Flight Facebook Group and check out the other amazing Design Team inspiration!  On May 7th, I will be hosting a Mystery Craft Along in the group.  All the details will be coming soon!  
Thanks so much for stopping by! 
Xoxo, Kim