Showing posts with label Copic Coloring. Show all posts

Tuesday, February 28, 2023

Joy & Peace!

 Hi crafty friends!  Today, I am up on the Prickley Pear Blog with another fun card that I created using the new Peace Collection from Prickley Pear Stamps that was released earlier this week.  This time, I wanted to create a hippie themed mini slimline card, so I focused more on neon colors (a first for me)!

I pulled out my fluorescent Copic markers and worked on finding some color blends that would work (I think I nailed it) and then I set about coloring the images.  Once I was done, I cut them out and set them aside.
I paired a fun tie-dye digital paper with some colored strips and adhered them to my card base.  I added a die-cut heart and a loopy bow and then arranged the images on my card front. 

This card was really out of my comfort zone, but I had SO much fun creating it!  I hope you are inspired to get crafty!   Make sure to head to the shop and check out the new release!  You will not be disappointed! 

Thank you so much for spending a few minutes of your busy day with me!

Xoxo, Kim

**Affiliate links have been provided at no additional cost to you.  Thank you so much for supporting my hobby!**

Saturday, February 25, 2023

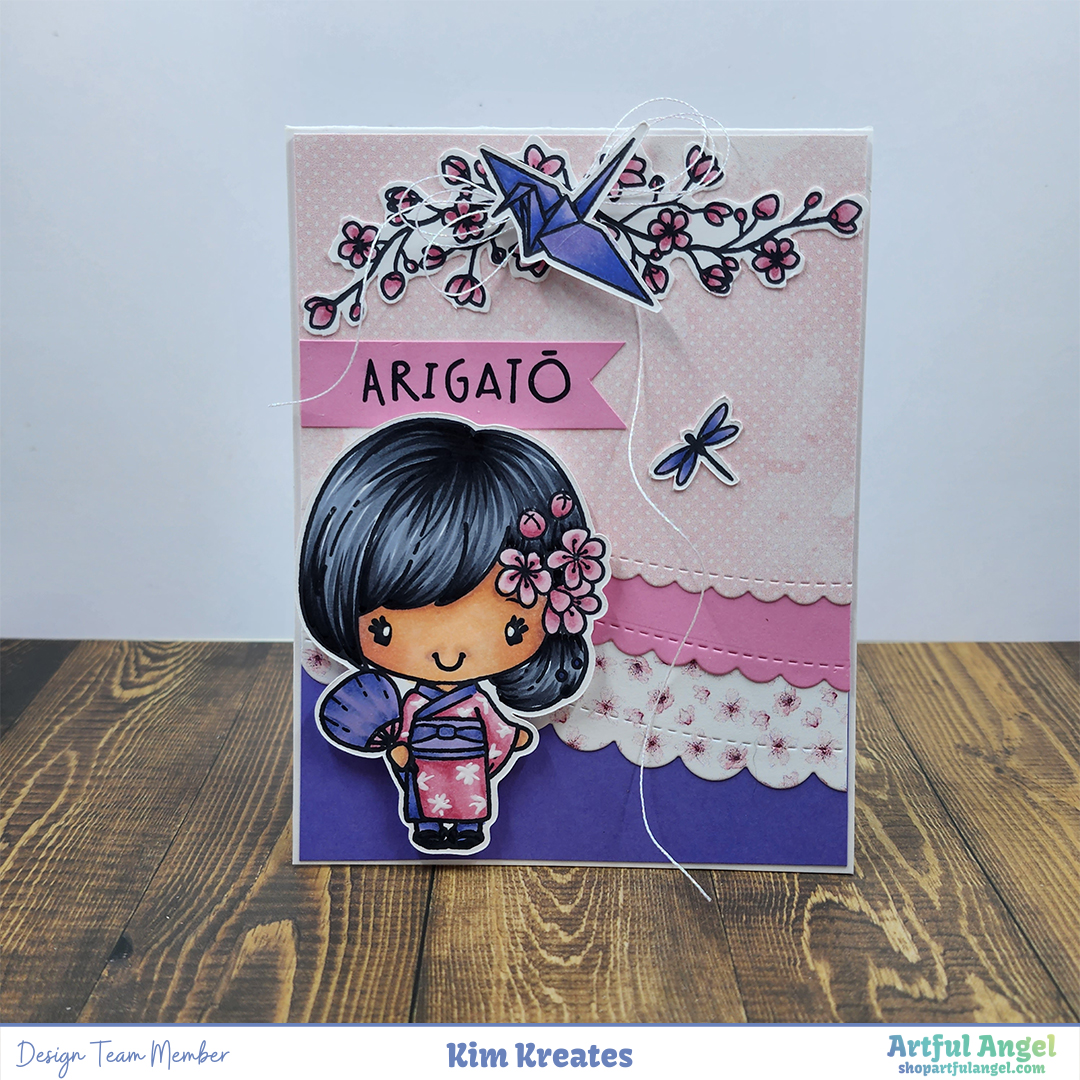
Arigato (Thanks)!

Hello friends!  Today, I am sharing a sweet card that I created for the February Artful Angel Instagram Hop! 

Did you know that Artful Angel carries The Greeting Farm stamps in the shop?  They are some of my absolute faves, so I was so excited to get to use the darling Anya in Japan stamp set. 

I colored Anya using Copic markers and added some white accents with a gel pen before cutting her out.

I also colored up a few of the cherry blossom branches, the origami bird and dragonfly before cutting them out. 

I used the Stitched Scalloped Borders Dies from Kat Scrappiness and die-cut several panels from solid card stock and digital papers.  I layered everything up, stamped the sentiment and created a banner and added a loopy bow behind the origami bird. 

This was a really fun card to create!  Truthfully, any time I get to use The Greeting Farm stamps is a happy day!  I hope you will join us over on Instagram for a fun hop with the rest of the Design Team! 
Thanks so much for stopping by! 
Xoxo, Kim

**Affiliate links have been provided at no additional cost to you.  Thank you SO much for supporting my hobby!**


Tuesday, February 7, 2023

Sending Good Thoughts Your Way!

 Hello, friends!  I am back to share another card that I had the pleasure of creating with the gorgeous Brighter Days Ahead Stamp Set from Prickley Pear Stamps!

Similarly, to the last card that I created, I stamped the image at the base of a vertical panel and I colored the image in with Copic markers.  I used the same mask that I used on the last card and I covered the stamped and colored image so that I could ink blend a beautiful daytime sky with Distress Oxide inks. 
Once I was happy with the sky, I heat embossed the sentiment on a coral panel of card stock and backed it with yellow.  I layered my landscape on the same colors and adhered them to the card base.  Just before adding my sentiment panel to the card, I added a loopy nest of gold thread behind it with mini glue dots.  Lastly, I popped the sentiment panel up with foam dots.
I really love how easy it is to change the look of this stamp set just by changing the color palette.
I hope you love this card as much as I do!  Please make sure and head to the shop to check it out! 
Thank you so much for spending a few minutes with me today!
Xoxo, Kim

**Affiliate links have been provided at no additional cost to you.  Thank you for supporting my hobby!**

Sunday, October 30, 2022

Hello From A Furry Friend!

Happy Sunday, friends!  I hope that your weekend has been amazing! Today I am super excited to share one of the cards that I created for the Pawsome Dogs Re-Release from Kat Scrappiness!   I am 100% in love with this card!  

I started by using the In the Doghouse Dies to die-cut the pieces for the fire hydrant, food and water dishes, and the grass.  I then inked each of the pieces up with Distress Inks to add some depth to them before putting each item together.  Once I was happy with them, I set them aside. 
I colored up this adorable little lazy dog from the Pawsome Dogs Stamp Set and cut it out with the coordinating dies
To create the background, I die-cut a piece of white and gray card stock using the Stitched Nesting Dome Dies.  I stenciled clouds all over the white piece and I tore the gray piece to give the illusion of uneven ground.  I inked the gray cardstock up and adhered it to the top of the white dome.  I then made a dome-shaped frame using two of the nesting dies and adhered it over the background.
I layered a piece of paw print paper from the Pawsome Boy 6 x 8 Paper Pad over a piece of red card stock after inking the edges of both with Walnut Stain Distress Ink and adhered it to the card base.  I added the dome element to the card front before arranging and adhering the images.  I used the Simple Sentiments Stamp and Die Bundle for the "Hello Friend" sentiment, which I backed with a piece of red cardstock.  Lastly, I added some of the beautiful Almandine Garnet Rhinestone Mix to the front of the card for a bit of bling.
I hope you love this card as much as I do!  It was a ridiculous amount of fun to create, and I am so pleased with the results! 
Thank you so much for stopping by and spending a few minutes of your day with me!  I would LOVE to know - are you Team Woof or Team Meow? 
Xoxo, Kim


Wednesday, October 26, 2022

Girl Power!

Hi friends!  Recently, a friend asked me to create a special card for her.  Her daughter plays competitve softball and will be traveling to Spain to play next summer.  She needed a thank you card for an incredibly generous donor, so of course I said yes!  

I found this adorable digital stamp on Etsy from Mujka.  I colored her up with Copics (listed below), cut her out and set her aside. 

I paired her with some softball themed digital papers from Scrapbook Gems (also on Etsy).  If you have ever wondered how I determine what Copic colors I will use, here's my trick.  I try to select and print my papers before I begin coloring.  That way, I can select my color blends to coordinate with the papers. 
I die-cut a few ovals and layered them on top of some baker's twine and then adhered my image.  I added a few black rhinestones and voila!  Card front finished.  I didn't get a photo of the inside, but I layered up some panels and I printed a panel that says, "Thank you for your support!" 
Colors Used: 
Skin - E04, E11, E21, E00, E000
Hair - E42, E81, E41, E50, E40
Uniform (Black) - C10, C8, C6
Uniform (White) - C2, C0, 0
Uniform (Coral) - Stampin' Up Calypso Coral Light and Dark
Softball - Y08, Y04, Y02, R29
Mitt - E18, E15, E13
I am so happy with how this card turned out!  I hope you love it too!  
Thanks so much for stopping by! 
Xoxo, Kim

Sunday, October 23, 2022

Merry & Bright!

Happy Sunday, friends!  Yesterday, my friends LV Handcrafted, StamprGrl and I did another Live Crafty Fun w/Friends Session on YouTube and oh, the fun we had!  We were joined by many of our crafty friends, and we made some new friends too!  I just love this crafting community!  Charis, the owner of Artful Angel gave us permission to share the entire upcoming October Release with our participants, so they were able to see it up close before anyone else AND one lucky live participant won the ENTIRE release before it can be purchased.

The three of us, along with anyone that crafted along with us, created a Split Window Card.  This is a fun-fold technique that was made popular by Jennifer McGuire.  LV Handcrafted walked us through two different techniques for creating this fold!  

While we were live, I spent a short time finishing coloring Mrs. Clause (I had colored Santa, and most of Mrs. Clause ahead of time) with Copics (listed below) and set the images aside.   These beautiful images are part of the Santa & The Mrs. Stamp Set that will be released on October 25th.  (The hyperlink for the stamp set won't be live until release).

If you happen to watch the replay, you will see what my crafty process is often like - complete chaos!  I was a hot mess and couldn't figure out what I was doing.  One thing that I love best about our live session is the participation in the chat!  Our friends that are chatting live can give us suggestions and help us actually create.  This was my saving grace in this crafting session!  
I initially had intended to have Santa and Mrs. Clause snuggled up together, but I completely missed the mark when I did my die-cutting and scoring.  (Did I mention I was a HOT MESS? LOL)  So, with the help from my crafty friends, we came up with a new plan, and instead, Santa is presenting Mrs. Clause with her gift - jewels!   Who girl doesn't love a little bling from their main squeeze? 
I also heat embossed one of the sentiments that are included in the upcoming Big Christmas Stamp Set.    If you have not checked out the Artful Angel Big Sentiment stamp sets, you should!  They are full of a main sentiment in multiple fonts and numerous coordinating sentiments, so they are HUGELY versatile!  
This is how the card opens up!  I absolutely love the end result!  
Colors Used:
Skin - E04, E11, E21, E00, E000, R20
Hair - C8, C6, C4, C2, C1, C0
Clothes - R59, R29, R27, R25, 100, W9, W7, C1, C00
Gold Gelly Roll Pen
If you weren't able to join us for the live, don't sweat it!  You can catch the replay and if you create a card, share it with us in the Crafty Fun with Friends of LV Handcrafted Facebook Group!
I hope that you have been inspired to get crafty!  I can't tell you how much fun I had yesterday!   We will be celebrating the Artful Angel October Released with an Instagram Hop on October 25th, and one lucky hopper will win the entire release and the Design Team has created some incredible inspiration for you! 
Thanks so much for spending a few minutes with me!
Xoxo, Kim

Friday, October 14, 2022

Happy Thanksgiving - Eat Chicken!

Hi crafty friends!  Today, I am over on the Kat Scrappiness Blog sharing a project and I wanted to share it here with you!  You may that remember that recently, I participated in a Live Craft & Chat with my crafty friends, @LV Handcrafted and @stamprgrl to celebrate World Card Making Day.  We had an absolute blast and I was able to complete this card.  

During the Craft & Chat, Linh, Dalis and I all worked from the same sketch from CardMaps.  It was so much fun because each one of our cards were drastically different.  I colored the turkey from the Kat Scrappiness Gobble Gobble stamp set with Copics (listed below) during the live.  That was an adventure.  I have never colored in front of people - add having to talk on top of that, and OMG. Once I finished coloring him, I cut him out and set him aside. 

This is the sketch that we used. 


I layered 4 different squares from the Gobble Gobble 6 x 6 Paper Pad onto colored cardstock squares and adhered them to my card front.  I die-cut a circle and I stamped one of the sentiments from the Happy Fall Y'all stamp set. I cut the sentiment strip into a banner, along with two strips and adhered them to the underside of the circle before placing it on the card front and trimming off the excess.  

To complete the card, I tied a loopy bow from gold metallic thread and placed it behind the turkey before adhering it to the card front, followed by some strategically placed Chocolate Jewels.
Copics Used: 
Burgundy - E49, R59, R29, R24
Orange - YR18, YR27, YR24
Gold - YR24, Y26, Y23, Y21
Teal - BG49, BG57, BG53, BG11
Brown - E29, E27, E25, E23, E21
Sign Frame - 100
Sign - E25, E23, E21
Eyes - C1, C0, 0
This card was so much fun to create, doubly so, as it was done while spending time with crafty friends!  If you missed out on the Live Craft & Chat, don't fret!  We will be doing it again on October 22, 2022.  This time we will be creating a fun-fold card together!  
Please make sure to head on over to the Kat Scrappiness Shop!  She has absolutely EVERYTHING you could possibly need to create cards for all of the upcoming holidays, and then some!  
Thank you so much for stopping by! 
Xoxo,  Kim

**Affiliate Links provided at no additional cost to you.  Thank you for supporting my habit, I mean hobby!**


Wednesday, September 7, 2022

Coffee... Because!

Hi friends!  I have been dying to share this fun project that I made recently, and FINALLY I can!  Scrappy Boy Stamps hosted a Memory Dex Swap and I had had to make sure that my partner received it before I posted it. 

I colored up this adorable girl from the Cute Girls - Coffee stamp set with Copic markers (listed below).  This is literally one of my FAVORITE stamp sets, and I was lucking enough to buy it from Sean at the Stamp & Scrapbook Expo!   If you know me even a little, you know that for me, coffee is life!  I drink it for the protection of everyone around me.  I cut her out and set her aside to create my Dex card.  

Sean (Scrappy Boy) and I at Stamp & Scrapbook Expo Puyallup
Sean (Scrappy Boy) and I at the Puyallup Stamp & Scrapbook Expo in May

I die-cut the Dex car several times - twice from red card stock, and twice from the I love Coffee 6x6 Paper Pack using the Stitched Memory Dex Cards Dies.  I wanted to be sure that the stitched edges all lined up.  I trimmed down the coffee bean patterned paper and adhered it to the red card base, followed by a strip of the polka dotted paper. 

I heat embossed the sentiments from the set in white and trimmed them down to adhere to the card front.  I added a red heart using one of the dies from the Memory Dex Essentials Die Set, followed by my coffee loving friend.  Before I glued her down, I drew in the white stitching and the heart on the coffee sleeve to make it stand out. 

 I added a bow using my absolutely favorite ribbon, which unfortunately was retired probably 20 years ago.  I don't know what I will do when I run out of it.   I also added a coffee bean brad from the Eyelet Outlet Coffee Brads that I also picked up at the Expo.   Lastly, I adhered the second red Dex card that I cut out to the back.  

Colors Used: 

Skin - E04, E11, E21, E00, E000, R20

Hair - E29, E08, E13

Shirt - G99, YG67\, YG63, YG61

Pants - B29, B26, B24, B21

Cup - C2, C0, 0

Sleeve - E43, E42, E41 (I think)

Heart - R59, R29

Posca Paint Pen - White

I literally love this card so much that I had a terrible time sending it; however, my swap partner loved it, so I am thrilled!  

Thanks so much for stopping by!  I hope your day is amazing! 

Xoxo, Kim

Tuesday, September 6, 2022

Yee-Haw! Let's Eat Cake!

 Hello, friends!  I am so excited to share my first project as part of the AMAZING Design Team for Keep It Simple Paper Crafts!  

The adorable Little Cowgirl Birthday collection is the latest release, and I cannot tell you just how fabulous it is!  It has EVERYTHING you could possibly need to make any little (or big) cowgirl's dreams come true! 
I created a fun easel card using several of the products in the collection.  I stamped several of the images and colored them with Copic markers (colors listed below).  I die-cut them using the coordinating dies and set them aside. 
I created my card base from heavyweight kraft card stock.  I die-cut the lacy, scalloped square using my Cricut, and paired it with a few of the adorable, printed papers that are part of the collection.  I distressed the edges of all of the layers using Walnut Stain Distress Ink. 
I stamped two of the sentiments from the coordinating sentiment stamp set - one for the front, and one for the inside - and trimmed them to size, and then layered them on pink card stock.  For the inside of the card, I adhered the flowers and then popped the sentiment up using foam dots, which creates a stopper to hold the easel up when the card is opened.
To complete the card, I colored some white seam binding using my So Saffron Stampin' Blend Marker to coordinate with the card stock.  I adhered all of my panels to the base.  I popped the main image up on foam squares, added a loopy bow and the coordinating enamel dots.  
Colors Used: 
Pink - R32, R30, R000
Orange - YR18, YR27, YR24
Green - G07, YG25, YG11, YG00
Yellow - YR24, YR23, YR21
Purple - BV17, BV11, BV00
Brown - E29, E27, E25, E23
Skin - E04, E11, E21, E00, E000, R20
Hair - E99, YR24, YR23
Shopping List: 

I hope that you love this card as much as I do!  Please head over to Keep It Simple Paper Crafts and check out all of the beautiful products that they carry, especially the fabulous Little Cowgirl Birthday collection!  We would love it if you would join us in the Keep It Simple Facebook Group!  
Thanks so much for stopping by!  
Xoxo, Kim

Wednesday, August 31, 2022

Fun in the Sun with Timmy Turtle!

 Hello, everyone!  I don't know about you, but I can't believe that September is nearly here!  I am taking one last shot at summer today, because as much as I am looking forward to sweater weather, I am not quite ready for our rainy season!  

I had the absolute pleasure of working with some more digital images from Last Minute Manda and I chose the adorable Timmy Turtle Loves the Beach digi set and made this super cute trio of summer cards. 

I colored all of the images using the same color palette with Copic markers (listed below), cut them out, and set them aside to figure out my layouts.  I found some the amazing Gone Surfing digital paper collection from Scrapbook Gems on Etsy that I used on all three cards. 
How cute is this darling turtle driving the car?  I wanted to add something to the license plate, so I used the Honey Bee Stamps Big Pickup Tailgate stamp set to add the license plate text.   It was perfect! 
I die-cut two circles using the Card Basics Dies from Kindred Stamps and I inked the edges using Stampin' Up Pacific Point ink.  I inked the edges of all of the other card stock panels using Stampin' Up Pumpkin Pie ink.  For the sentiment, I did some two-toned stamping using the same colors with the Celebrate & Enjoy stamp set from The Greeting Farm.
To complete my card, I popped the sentiment panel up on foam squares, the turtle and car on doubled up foam squares and then added some Dew Drops. 
For my second card, I paired this cute image from more digital papers from the collection I mentioned above.  I used the Elizabeth Craft Stitched Indented Squares to create a backdrop for the turtle.
This time, I inked up the edges using Squeezed Lemonade Distress Ink and Pacific Point from Stampin' Up.  I stamped the sentiment from the Mini-Remix Sunshine stamp set from the Greeting Farm and I popped that panel up on foam squares. 
I then popped the turtle up using doubled up foam squares to give him some extra height.  Lastly, I added some Dew Drops. 
For my last card, I found a sentiment that I really loved, and I printed it out.  I used the Card Basics Dies from Kindred Stamps to die-cut my circles again, and I inked all of the panels up using Pacific Point ink.  (This time I inked the entire circle using a sponge dauber). 
As in the previous cards, I used a single layer of foam squares for the sentiment panel and I doubled them up for the main image.  Lastly, I added some dew drops. 
Colors Used: 
Turtle Body - G07, YG25, YG11, YG00, R21, R20
Turtle Shell - YG67, YG25, YG23, E13, YG21
Yellow - Y17, Y15, Y11
Red - R59, R29, R27, R24
Blue - B18, B16, B14
Brown - E18, E15, E13
Orange - YR09, YR07, YR04
Glasses Lenses/Headlights - BG10, B00, B000, 0
Gray - N6, N4, N2, N0 and C10, C8, C6
I hope you love these cards as much as I do!  If you haven't checked out Last Minute Manda's shop on Etsy, please do!  Her images are just so much fun to work with! 
Thanks so much for stopping by! 
Xoxo, Kim

Tuesday, August 30, 2022

The Sky's the Limit!

Good morning, friends!  I had so much fun creating this cheerful mini slimline card using the Blue Skies stamp set from Lawn Fawn and I have been DYING to share it with you!  

I loved coloring up these beautiful hot air balloons with Copic markers (colors listed below) and I used the coordinating Lawn Cuts to cut them out. 

I die-cut the grass, sun, and clouds using the fabulous Up In The Clouds dies from Whimsy Stamps.  I paired the grass and sun dies with some cute polka dot digital papers that I found on Etsy and used them to create my scene.  I stamped one of the sentiments from the set and cut it up, and then backed each piece with the yellow polka dot paper and I popped the word "sky's" up on foam dots to make it stand out.  Lastly, I added some Dew Drops. 
Colors Used: 
Red - R59, R29, R27, R24
Orange - YR09, YR07, YR04
Yellow - Y17, Y15, Y11
Green - G07, YG25, YG11, YG00
Blue - B18, B16, B14
Brown - E18, E15, E13
A HUGE thank you to Lawn Fawn for providing such a fun product to craft with!  Your generosity is so appreciated!  
I hope that this card serves as a reminder that there is NOTHING you cannot accomplish!  The sky is truly the limit!   Thank you so much for stopping by! 
Xoxo, Kim